


It’s remarkably easy to hack LEDs into Lego minifigures to make awesome, creepy, and tiny decorations for Halloween.
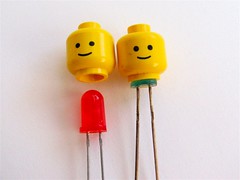
In what seems like a miraculous coincidence, a standard LED fits exactly into the head of a Lego minifigure. It’s that easy: grab an LED and a head, slip it in, and it fits perfectly.
The modern Lego minifigure dates to 1975-8. Since LEDs were already coming in 5 mm packages (also called T 1 3/4 packages) by the mid 1970’s, it’s clear that Lego minifigures were made to fit LEDs in their heads. It’s a sign from above: The little yellow guys are simply meant to have light-up noggins. Who are we to argue with fate?


It’s a good idea to carve your head before putting the LED in. (No, not your head, the head of your Lego minifigure.) This is particularly important if you’re starting with an older Lego head, since the suction can make it hard to remove the LED. (Newer Lego minifigure heads have a vent in the top.)
If necessary, wipe the smile (and eyes) off of its face with some rubbing alcohol. To carve the face, use a hobby knife with a sharp blade. You will be tempted to work with the knife very close to your face, so that you can see what you’re doing. That’s fine, but it’s a very good idea to wear some eye protection. Once you’re done carving, use the knife to remove any burrs or chips on the inside, which could make it difficult to insert the LED.

In order to mount the modified head on the body, you’ll need to cut off the neck and widen the hole to accept the base of the LED. I actually trimmed the bottom of the LED down a bit so that I didn’t have to make the hole quite so big. In any case, carving the body is quick and straightforward with the knife. I didn’t have any batteries small enough to fit inside the body itself, so I also cut a little hole in the back to let the leads out.
To assemble the figure, take the legs off, put the LED in the head, put the head on the body, bend the leads out the back, and reattach the legs. This works well because once it’s assembled, you can’t see the leads from the front.

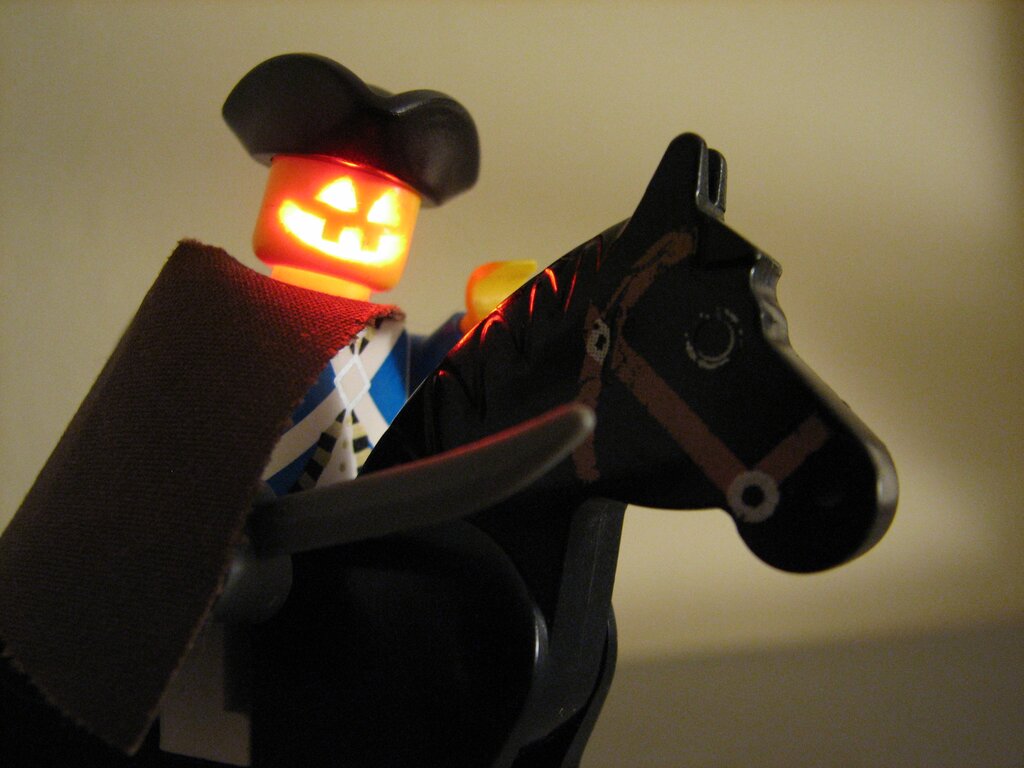
Here’s the completed figure: It needs a caption! Please leave your suggestions as comments or on its flickr page!
The figure stands on its own. The leads of the LED stick out the back, where they lightly touch the sides of a lithium coin cell.

The pumpkin head took several hours to carve. The next day I had blisters on my thumb and index finger where I had been holding this little head (tight) while I carved.
While it is often difficult to get this level of detail in something so tiny, the hardest part in this particular case was making the three initial holes through the thick plastic. If I had to make this one over again, I would start by drilling three tiny holes in the head.


I put a red-orange LED in the head and attached it to a lithium coin cell to try it out. It looks a little bit like an LED throwie, but I guess that it’s really a
“Lego throwie.”

The pumpkin head was attached to this minifigure body, which was modified in the same way as the other body. The Lego horse provides a platform to rest the lithium battery, and the cape covers it all up. The things fit together nicely on their own, and no tape or glue was necessary.

With the lights turned down a little bit, the Headless Horseman is ready to ride. See some of his comrades in the collection of Lego Abominations.
You can find more Halloween decor projects in our Halloween Project Archive.
What kind of a knife did you use to carve them? These are fantastic!!!
Thanks!
I used an X-Acto knife with a “#11” type blade– using a sharp blade is
themost important thing; I went through several. Tower
Hobbies sells a pack of 100 #11 blades for $11, Part number LXJC80.
—
Windell H. Oskay
drwho(at)evilmadscientist.com
http://www.evilmadscientist.com/
I made one using a heated little nail to burn out the eyes, worked great
OK, this is brilliant.
Let’s say I was going to cut all or part of the pegs off the tops of the legs and buy back some of the space inside the body (perhaps requiring a small amount of glue to get everything back together). Would there be enough room in there for a compatible battery? I’d love to see a seemless lit-up minifig!
Great post!
Dave
I tried using a small hearing aid battery, but it was still too large. I just did a
search and it looks like it’s been done. I guess you just need a smaller battery.
—
Windell H. Oskay
drwho(at)evilmadscientist.com
http://www.evilmadscientist.com/
After seeing the original concept here I thought I’d try to fit all the
components internally…and was able to pull it off. It was kind of a hack job,
because it was a proof of concept, but I’m going to do a cleaner job when I
have more time (and a better Dremmel bit!). It worked though!
http://web.mac.com/granthorst/iWeb/HorstWeb/Hallegoween.html
-G.
Nicely done– That looks great!
Looks like you used a CR1025 lithium battery (?), I’ll have to get some.
—
Windell H. Oskay
drwho(at)evilmadscientist.com
http://www.evilmadscientist.com/
Have a look at the star wars light up lightsaber minifigs, they fit 2 off cr927 3v lithium batteries in a body cavity
FYI – the "Remembrall" piece found in some of the first series Harry Potter sets is made from the same mould as the minifig heads, only in clear plastic with some printed-on details.
I’ve seen those, I may even have some. They’re really cool, and would make
a great lego “lantern” or something. The only problem is that they
don’t really seem like Lego heads because they’re so different.
Maybe you could make a creepy ghost Lego by adding a ghostly face to one?
—
Windell H. Oskay
drwho(at)evilmadscientist.com
http://www.evilmadscientist.com/
Thats awesome i’m making my own one which are gonna be a bit different though i will use a drill for the saves energy instead of carving it even though it looks neat the way it was cut in that article
It seems like putting a resistor inside the body and having leads and contacts protrude into the legs might allow you to create electrified ground tiles! If you were really creative, you could drive all the tiles with an AC source (every other peg is the alternate polarity in both directions), effectively giving the led a 50% duty cycle (aka not as bright) but allowing you to position the lego men as you see fit! Use some really high brightness leds and they should still be more than bright enough to light the head and create a great flow.
I have two main words of advice for this particular project: bench vise. What are mad scientists without their secret workshops full of slightly menacing-looking tools? It just boggles my mind that people with these kinds of ideas and the further madness to make them into reality would lack such a nifty tool as a vise.
The reason why my brain went VISE in big letters when I read the text on the lighted-figurine construction was it sounds like whoever made them took a Lego head between their two fingers and proceeded to carve it like a pumpkin.
Seriously, pumpkins big enough to carve on a table, even those with nice flat bottoms, roll around like crazy when you stick a knife in them. So a Lego head between two tired, sweaty fingers is just not going to stay there. I have used a Sharpy brand marker to decorate the little buggers before, and my fingers were covered in ink afterwards. Your hands willl be covered in blood….
Just root around in your junk-drawer or junk pile and there is bound to be something vicey in there. If nothing can be found, visit your local hardware store and treat yourself to a small, inexpensive table vice, the kind that clamps onto any old table with a sturdy edge.
Put two scraps of something softer than the ABS plastic Legos are made of in the Vice (thin cardboard is good) with the head between those, tighten the vice enough that the pads squish a bit, let out an evil cackle, and carve away!
I might not have cared so much except some of us Evil Mad Scientist types require a bit of medication, and with every 500 people costing money in the ER for Exacto-related injuries, my pills go up a cent or two. So I am not just writing this for the heck of it.
My fellow madmen and madwomen and madwhatevers, keep in mind that it is SO much easier to carry out your evil plans with all your limbs intact. Be as safe as lunacy allows!
Well, for the record I *did* actually carve these heads held between my fingers, and I didn’t manage to cut myself.
However, your advice (pun intended but admittedly bad) is sound. Two additional points to add to what you’ve said: clamp to the ends, not the curved surfaces and make sure that it’s tight enough not to slip!
—
Windell H. Oskay
drwho(at)evilmadscientist.com
http://www.evilmadscientist.com/
This Rocks man You are a genius.
Awesome. Any way to get the horseman to hold the LED/head in his empty hand?
Possible, but less easy– the arms are hollow but the "wrist" piece is not; no room to fit wires in there.
—
Windell H. Oskay
drwho(at)evilmadscientist.com
http://www.evilmadscientist.com/
kool i made a few today luv ur site
Incredible!!!
that’s smart I might try that
This is awesome. Have you thought about using the led candles that use the same kind of battery? Then you could put the leads through the legs and have a base. Also the battery would be hidden.
Queenie,
strwberriesncrm80@yahoo.com
This is truly awesome!!! love it.
"Bring me computerrrrrrrrrr"