Last year David Friedman published on his blog Ironic Sans an interesting design concept for something that he called The Bulbdial Clock.
That’s like a sundial, but with better resolution– not just an hour hand, but a minute and second hand as well, each given as a shadow from moving artificial light sources (bulbs).
We’ve recently put together a working bulbdial clock, with an implementation somewhat different from that of the original concept.
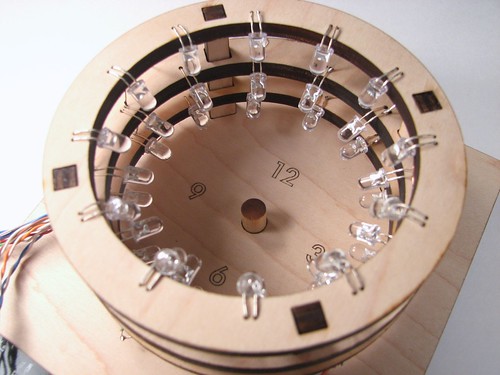
Rather than using three physically moving light sources at different heights, we use three rings of LEDs at different heights. Within each ring, we only turn on one LED at a time, so that we only have a single effective light source– it can light up at different places from within the ring. The three rings are located above one another so that they each project light onto the rod in the middle, making shadows of different lengths.
Additionally, for fun and clarity, we used red, green, and blue LEDs for the three rings, making each shadow hand of the clock a different color. Each ring has 12 LEDs, and the 36 LEDs are efficiently multiplexed by an AVR microcontroller that also handles the timekeeping part of the project.
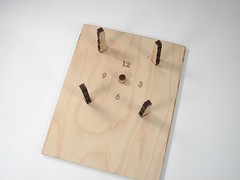
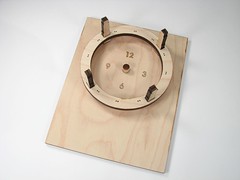
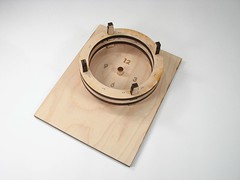
This clock is mostly built out of laser-cut plywood.
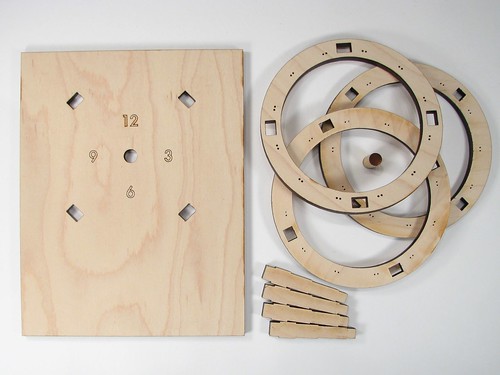
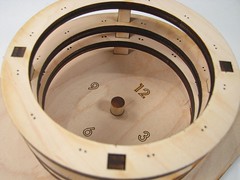
This is 1/4″ (6 mm) plywood, which holds remarkable precision with the laser cutter. There are three rings, shaped spacers that keep the rings above the base with the clock face, and a hardwood dowel rod.
It’s really quite a three-dimensional project! The rings each have pairs of small holes in them to mount the LEDs in place.
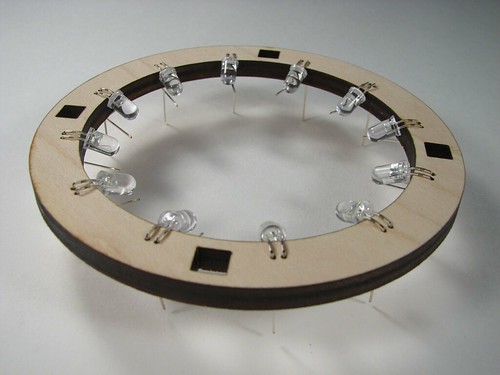
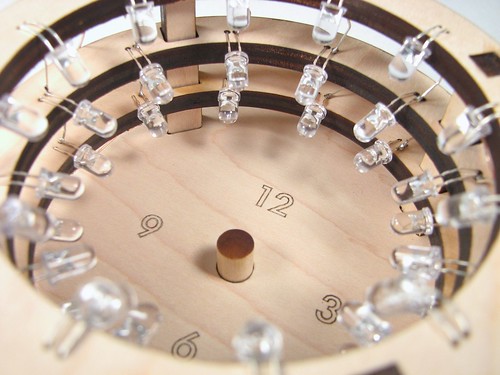
Each of the rings gets stuffed with 12 LEDs, with the correct orientation and spacing– long enough leads– that they can point towards the rod (and make good shadows) once they are in place.
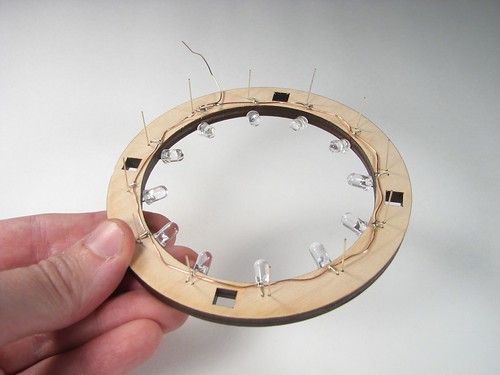
Since each LED is only supposed to be on one at a time, we can drive the whole array pretty easily, and directly from the microcontroller, Here we are turning this array of LEDs into a single common-anode unit, by hooking all of the LED anodes together. Likewise, after we stack these, we connect the cathodes — vertically for the three rings– and hook those up to the microcontroller as well. For three rings (colors) and 12 cathodes, that means that we need 15 pins to control the array.
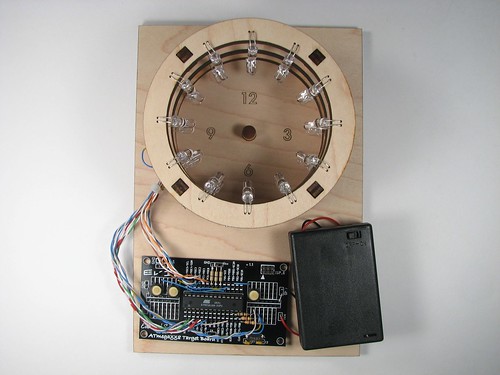
The next step is to add the control electronics. I used one of our business card boards, an ATmega168 microcontroller (programmed through a USBtinyISP), along with a 16 MHz crystal oscillator, a 3xAA battery box with switch and three tactile button switches. Not to mention a snarl of wire. There are also three resistors, two 50-ohm and one 100-ohm, which are used when driving a red LED, or blue or green, respectively. Because only one LED is on at a time, we only need one resistor for each color.
Of the three buttons, two are used for setting the time– one is fast advance, one is slow advance. The other button turns on or off the LED, but does not turn off the microcontroller. When the LED is on, the circuit uses about 26 mA of current. When the LED is off– just timekeeping, not displaying — it uses about 11 mA. These could both be reduced by using larger resistors and reducing the speed of the microcontroller.
(Aside: These parts were chosen principally for being the ones lying around. However, they’re mostly the right kinds of thing. The microcontroller is about the right size for the number of pins that are needed for this project, but we probably could have gone with one that had less memory– the control program is pretty small. A quartz crystal oscillator is nice because it’s *a clock* and shouldn’t lose much time. But 16 MHz is much faster than is needed, and the power consumption of microcontrollers depends on clock speed, so I’d pick (maybe) a 1 MHz crystal next time. The battery box is actually just right– 4.5 V provides comfortable headroom for driving blue and green LEDs, but not too much, and AA cells give sufficient capacity to make a non-annoying battery powered device, once we tweak that power consumption a bit more.)
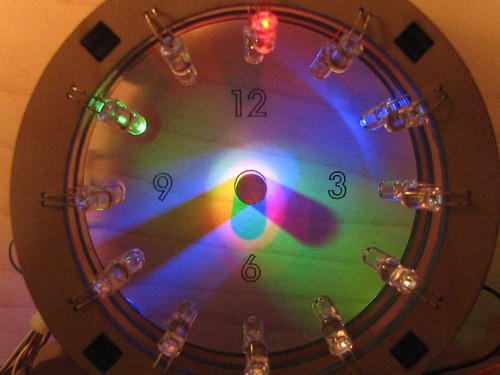
As we have noted, it’s pretty tricky to get good photos of LEDs, but you can kind of get the idea here– just imagine that the colors are bright and vibrant.
In this photo the time is about 6:20:40. (Like many clocks, it’s hard to read with high precision. Even so, the seconds help to create the sense that something is happening.) The short hand, the hour hand, is created by the shadow of the red LED, and points to 6, indicating 6 o’clock. The medium hand, the minutes hand, is created by the shadow of the green LED, and points to 4, indicating 20 minutes past the hour. The seconds hand, the longest one, is created by the shadow of the blue LED, and indicates about 40 seconds past the minute.
What’s *really* neat about this is how the colors interplay. Where all of the LEDs hit, a white color (additive RGB) is produced. Then, as you subtract one of those three colors– as in the shadow of a single LED, the results are subtractive colors, and the hands on our clock face are in the colors cyan, magenta, and yellow. It’s just magical.
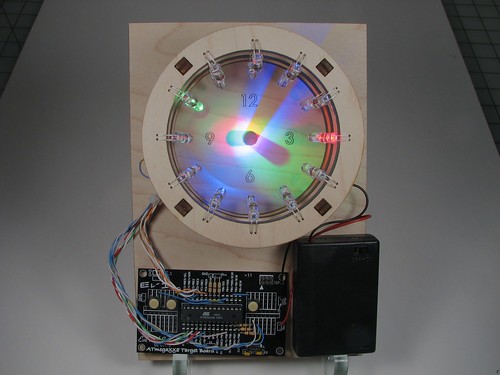
So that’s our new bulbdial clock; you can see additional a few photos in our flickr photo set here.
One more thing: We are thinking about making a kit version of this project (under license from David Friedman)– and we’d really like to have your feedback before we go further. There are a few obvious things that we’ll take care of– like a circuit board with dedicated (and labeled) buttons, a lower-frequency crystal oscillator to reduce power consumption, and holes to hang it on the wall. But we’d like to hear your other suggestions as well. :)
Update (December 2009):
We’ve listened pretty extensively to all of the feedback here (Thanks!) and reworked the project from the ground up. Amongst other changes, the new version has a plug-in power supply and classy outer case. We have just released the kit version, and you can read more about it here.


How about turning it round and projecting onto a translucent/frosted front? I guess the tricky bit is that the "shadow pole" would still need to be fixed to the front so it would have to be thick enough to support that.
++++!!!
i would so buy one if you did make them (under license of course)
I saw that site when you originally posted it, and had the exact same idea: to use LEDs instead of moving lamps. I had plans to build it, but it looks like you beat me to it! Curse my lack of time and money!
Very nice work though. :)
I would love to build/have one of these. I like the idea of a frosted front, too. Even using some lexan would work well.
I would also want to recycle a wall wart instead of using batteries, and it would be nice to hide the controller circuitry. If the lights were made to to a front face, this would leave a dark space in the back to hide the circuitry.
Absolutely fantastic. Wow!
Are you planning to enclose the electronics? What about another ring in front of the others that has a smaller opening to partially obscure the direct light coming from the sides of the LEDs?
Have you tried fading one second hand LED into the next one to get a sweep effect? Perhaps with a switch to select between the two modes.
>Have you tried fading one second hand LED into the next one to get a sweep effect?
We did try that, but it wasn’t a net positive because the LED spacing is relatively large. If we went to (say) 60 LEDs on each ring, then it would probably look much better to do fading… but it would take much more time to put together.
—
Windell H. Oskay
drwho(at)evilmadscientist.com
http://www.evilmadscientist.com/
60 is a lot, but what you could do is use 12 LEDs for the hours (charlieplexed 4 pins) and 30 LEDs for the minutes (charlieplexed 6 pins) and 30 LEDs for seconds (charlieplexed 6 pins) which is a total of 16 pins. This is much better than charlieplexing all 72 LEDs with 9 pins, because you still have the 3 different levels separated. 2 minutes/seconds resolution is not so bad and I bet the fading would work much better (especially with a software PWM, maybe 4bit = 16 levels). Just a thought…
what about a totally dark ring to cover the leds only?, it will let the people wondering how the clock works, and if the leds come in an rgb array that fade in fade out in array you will have a plasma effect with dancing colors that will make it an amazing clock – lamp
I would love to have one. Bring on the kit.
I’d love to see a kit! I showed this to my husband, and we both want to build one. I could get most of what I need at You-Do-It Electronics, but I’m not about to laser-cut the wood to look that nice.
You build the kit and send me one for, um, trial purposes, yes, and I’ll post it on my blog and send a few thousand people your way. :)
http://blogs.discovermagazine.com/badastronomy
Dido on the Video. Awesome job!
Very cool, but where’s the video? I want a video!
Kit? I’d buy one in a heartbeat. Some provision for wall power would be nice. Plus, you could turn the 60 Hz AC into an interrupt and use that for your timekeeping source.
I would definitely buy a kit for one of these.
This seems cool. You guys really, really, really, really need to post a video, then send links to said video to boingboing and slashdot. You will get a million hits in a day.
What I mean is: This is a great idea, but right now it takes (mild) effort to perceive the coolness. A still photo makes it hard to see the cool. A moving picture will have every geek from here to the International Space Station wanting to have one of these.
—
Furry cows moo and decompress.
Holy shit I know you—you’re the furry cows moo and decompress dude who’s also on thedailywtf.com! WHO THE HELL ARE YOU, AND WHAT IS IT ALL ABOUT?!
That is wonderful! Is it bright enough to be read in a normally lit room?
Consider a version without the "second hand": it would be slimmer, less gaudy, less expensive and easier to read.
Also, a small opaque cylindrical sleeve around each LED would block stray light and improve the contrast of the light "hands".
My 2cents,
@TallDavid
That looks great. Love the additive light effect. LEDs have such sharp shadows, this is terrific.
Awesome as it is, but since you asked, does a thinner dowel show up? Or one which is tapered to create shadow hands which are pointed?
Oh, larger!
-Rob Cockerham
Try placing the center post onto a lathe and turn down the regions where the light hits for the seconds and minutes so the longer cast shadows are not so fat looking. Nice job!
Try placing the center post onto a lathe and turn down the regions where the light hits for the seconds and minutes so the longer cast shadows are not so fat looking. Nice job!
I want this clock!!! This would be an awesome Kit!
I’ll take one.
The frosted front idea is great. Otherwise, I was thinking why the plywood wasn’t painted white before the laser etching.
I’ll add 5 minutes marks too.
Another thought: would a discrete transition from one led to another add a sense of continuous motion? I mean, for example in the seconds (blue leds) if you add different intensities and while one led goes from light to dark in discrete steps the other does exactly the opposite. It will take 5 second to transition in the case of the seconds. But I don’t know if it will add something to the project or not.
And about the button to turn on/off: the clock might be off, then if you press less than 2 seconds it will go off again as you release the buttons (as old led wristwatches) but if you keep the button pressed for more than two seconds it will stay on (repeat the procedure to turn off.)
Great project indeed!
Demian
I’d love to have one of these! A kit would be cool.
I would buy one of these in a heartbeat. My two cents:
Offer different materials for the lasercut parts. Maybe Bamboo…
Provisions for both battery and wall power (make the AC adapter optional).
Keep the "brains" visible just like on the Meggy Jr RGB. Keeps the coolness factor.
I have a thought. If you drop the second dial, as folks upthread have discussed, and made a larger diameter clock face, you could put say, twice as many LEDs on the hour or the minute hand for more precision on the time using basically the same power consumption and not requiring more connections to the controller.
Combine that with the fading from one LED to another for a faux "sweep" effect to create more of a transitional effect, and you might even fake a higher resolution.
Just wow. I have to have one too! Ever thought how much a kit would be?
Price will depend on the final design, of course. We were thinking about $40-$50 might be a good target price.
—
Windell H. Oskay
drwho(at)evilmadscientist.com
http://www.evilmadscientist.com/
Just discovered this site. I would definately buy a couple.
Idea #1: 60 LEDs, on each level. Use a demux to same microcontroller pins.
Idea #2: WWVB or GPS time synchronization.
+1 on 60 LEDs per ring.
Still, very cool!
how about 60 LEDs on a larger ring for minutes, and 12 LEDs for hours that fade between each other as the hour passes?
I’d buy one of these as a kit, just as it is, just ’cause it’s so cool. (Well, depends a bit on the price.)
But a few suggestions/thoughts/concurring with other comments:
– a video of the thing working would be really nice
– it is cool to see the electronics, but it might be nice to have them housed in something to keep the dust off (clear plastic cover of some sort?)
– wall power option would be cool
– how easy it is to read the time when you’re looking at it off-axis? To be a functional clock on a wall somewhere, it’d be nice for off-axis viewing to be reasonable. (Maybe make it bigger? Then the rings wouldn’t obscure as much of the face – though I suppose that might make the shadows not as dark, hmmm.)
Incredibly nifty idea, and well executed, of course!
What’s with all the "I want a kit" people? It already -is- a kit. You just want someone to build one for you, take it apart, and then send it to you so you can think you "built" it. There’s nothing terribly hard going on here, all the parts are available and pretty inexpensive, a small saw can do a sufficient job cutting the plywood if you don’t happen to have a laser cutter.
but we don’t have the ATmega code :(
I want to make one! Maybe you could do a secret kit with just the laser cut wood since most of aren’t as lucky as you and don’t have home laser systems (yet). Anyways another awesome project!
Oh, I would so buy this kit. I second the suggestion of including the laser cut wood.
I don’t plan to hang it on the wall, I want to mount it on a pedestal, like a real sundial. Multi-colored isn’t necessary, but bigger and higher resolution (i.e. tell the difference between 6:15, 6:18, and 6:20) would be nice.
Very cool. I’d be interested in building one if you release a kit. Suggestion: Either include or allow an option* of having a real-time clock chip. If the chip has alarm-style interrupts it could also be used to put the clock to sleep at a given time and woken up later.
* keep the i2c pins free and have a small proto-area.
Why are you guys asking for a kit ?
I think it is available (and they did hyperlink their online store)……………………..
ATmegaXX8 Target Board $4.75
Battery box, 3xAA, 2-pack $3.50
16 MHz crystal and cap set (1) $2.00
Headers, 6-pin DIP, 10-pk $4.50
Socket, 28-pin ZIF (1) $4.0
ATmega328P Microcontroller (1) $5.00
and if you do not have your own programmer…. they sell it also..
USBtinyISP Kit $22
http://evilmadscience.com/tinykitlist/35-tinykitcat/74
A kit for this project would include a circuit board (or boards) specific to this project, a pre-programmed microcontroller, and whatever laser-cut parts (plastic and/or wood) were required– this might end up being a very different set of components than what we started with here.
—
Windell H. Oskay
drwho(at)evilmadscientist.com
http://www.evilmadscientist.com/
I2C pins free and a little proto-area would be nice (so i can add sparkfun’s DS1307 breakout for nearly endless timekeeping)
Not to be rude but…
Gimme gimme gimme.
If only I had a laser cutter of my own…
I think it is awesome that you pulled it off! I love it!
My suggestion: Would you be able to make the center post conical? You might be able to get a more specific "reading" of the time if that center post was pointy and looked more like an arrow.
If the kit were easy to put together, I’d like to get one…
I’d love the kit!
I simply must have one of these. A kit would make the special spacers and rings easier, but if necessary I could do that in some other fashion. I like the idea of projecting onto frosted glass, just do the whole thing upside down. That way you don’t have the viewing angle problem (you have to look directly at it with the current design).
A kit for this would be hot. Definitely write up a post if this becomes available!
Very cool. One idea:
* TWO LEDs, placed close together at each five-minute mark (and powered together, not independently) would let you cast a "sharper" shadow.
And a question:
* What kind of battery life do you get the way it is?
Again, a very neat project.
~rob
How about a frosted acrylic post – it would pick up the colors of the led’s hitting it, and thus the end would glow nicely, but still cast the shadow needed as well (I think, I’ve obviously not tried it). Would make the clock just a bit more vibrant. Or you could put an led or three under it that cycles through colors to show AM/PM.
Also, GIMME! I want!
This very cool looking. I would suggest making it from laser cut plexi or lexan. It seems that the color from the LEDs glowing the outer edges of the rings would add another layer of "ooh, cool" to it.
excellent work — definitely up for a kit!
Yes please make a kit.
Thanks
I would purchase one of these in a New York minute. Please start developing a kit.
I’d be hard-pressed to keep myself from buying one for my classroom, one for my daughter to put together, and maybe one for my wife’s classroom.
If the cost is low enough, this would be a fantastic kit for schools – there’s so much for kids to learn, from wiring to color addition and so on, that there’s a real market for this in education, too.
Yes, really neat.
I agree with other posters, however, in that it would be better if you could hide the LEDs in some way — they are too distracting. Perhaps recess the LEDs in the rings?
I would absolutely love a kit. I buy lots from ladyada and she does a great job with them. Take a look at her site if you need an example to go by.
I’d TOTALLY buy a kit.
Nice execution! I don’t want a kit only because I want to make one from scratch myself. DId you try making the peg in the middle have a cone shape? It would create distinct points on the hands that we are all accustomed too.
Sweet. It’s been running through my head since I saw it, but I could never figure out a decent way to implement it with a physical clock so I never did. Three rotating rings might be an option for simpler builders, I’d never really thought of that setup. Now others are spinning in my mind again, three throwies on bent wires over the back of a clock would work, but not power supplying the leds from the same source as the clock is pretty lame.
I’ll take one kit when available…
This is a fantastic project that I would really enjoy. The only thing that I would suggest is a wooden faceplate (so that the user could stain it in his favourite colour). I’m anxious to see a kit available, I am definitely interested in getting one. Awesome work.
Doug!
( murray.dw@gmail.com)
If you tapered the center post, would the "hands" spread out less?
That was my thought, they should taper it to a point so that the hands get narrower towards the end instead of wider.
I’m also very sad about 5 minute/second precision. what’s the point of a 5-second hand if the minute hand can only hit 5 minute intervals?
Nice project. Frosted front would be neat, as well as hiding the electronics on the wall-side. Also, the baseplate could be round, producing a mostly cylindrical, layered structure, with open sides.
There are laser cut services on the web, such as Ponoko (http://www.ponoko.com/), so the patterns for pieces is all thats needed.
I initially like the idea of a tapered pole, so that the minute hand is more precise, but on reflection this gives a less accurate reading. The minute hand should be wide, as it is covering an entire 5 minute block without the ability to disciminate where in that 5 minute block time is at a specific moment. It should cover the right 5 minutes, as in, the shadow should start at the time when the shadow first appears, and end at the time when the 5th minute finishes.
cool project, nice work!
nick
I’d like a kit of just the necessary electronics bits – I can deal with the wood/clock face/rings parts on my own – and enough info for someone who’s never built a microcontrolled thingy before to put it together and program it… Seems like this would be an awesome microcontroller beginner project.
I would turn the three led rings by 15° clockwise, and light two of them together.
That would draw an arrow shaped arm, instead of the actual trapezium shaped one.
Count me in for a kit. Think how many geek points this would be worth in the office!
Yes. Kit. I will buy.
please mak a kit *do want*
Yes! Me Too!