Yearly Archives: 2013

DIWire Bender is open source

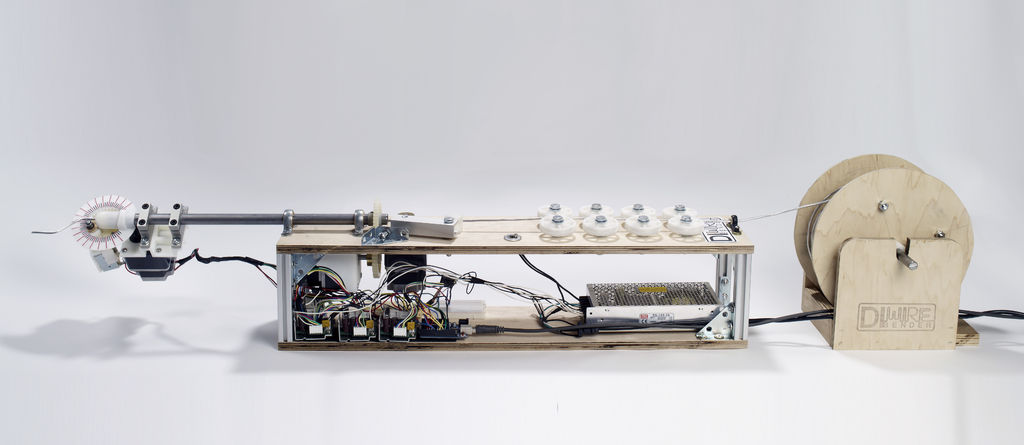
The designers at Pensa have released their fantastic homebrew computer-controlled wire bender, the DIWire, as an open source project, and have just posted on Instructables showing you how to build your own. The DIWire can take wire from a spool and automatically form it into arbitrary 2D or 3D shapes you have designed digitally.

We had a chance to see the DIWire up close and in action (and also to meet the folks behind it) at last year’s Open Hardware Summit and Maker Faire in New York.  The DIWire is exciting not just because of what it can do, but also because it represents the first of its kind in do-it-yourself CNC machines.

In the last decade, we’ve seen an explosion of DIY CNC mills and routers, and a separate explosion— at least as large —in so many now-familiar 3D printers.  But the DIWire represents a whole new class of DIY machines, completely different in function and form.  Will the next decade also bring us an explosion in homebrew CNC wire-EDM, water jets, embroidery machines, turret punches, and lathes?  We certainly hope so.

In addition to the instructable, documentation for entire DIWire project, including both hardware and software, is hosted at Google Code.

Peggy 2 Station Clock

Simon Jelley, the winner of our Peggy 2 Clock Concept Contest back in 2010, posted about how he took his prize and built his proposed clock: a video display of an analog clock face based on the clock in Victoria Station.

peggyvictoria

It looks even better in its physical manifestation than it did as a concept.

Thanks for sharing your project, we’re thrilled to see that you made it happen!

Art Controller Automatic Cat Feeder

Our friend Jonathan Foote, after a disappointing experience with a commercially available timed cat feeder, hooked up one of our Art Controller relay boards to an automated candy machine and posted about the project.

Jonathan says, “The resulting hack will reliably and elegantly deliver meals to my favorite pet.”

RoboGames Call for Entries Open

Last Rites and the Electric Boogaloo

RoboGames is now accepting registration for the 2013 competition which will be taking place on April 19-21 in San Mateo, California. Registration deadline is April 1. They’ve also put out a call for papers, demos and talks for the academic symposium with a submission deadline of March 16.

Another related— and very important —event to register for now is BarBot, which will be held in San Francisco on March 1-2. This cocktail robotics exhibition is an amazing amount of fun, and serves as a fundraiser for RoboGames. Registration ends on February 22 for BarBot entries, so it’s now time to get to work on your advanced fluid handling systems!

Robogames 2012-3

At RoboGames, robot builders are rockstars and heroes. It’s one of the few places in our society where engineering and technical ingenuity is exalted in a way that is usually reserved for sports and movie stars. It is open to anyone to participate, and the community of robot builders is incredibly welcoming. They provide huge amounts of information and advice to new and experienced robot builders. There are over 50 different events to compete in, so there is a robot type for everyone.  And it’s not just combat: There’s robot soccer and sumo, navigation and weightlifting, painting and climbing, firefighting and hockey, maze solving, and the all-important bartending event.

IMG_0798

If you have ever thought about building a robot, now is the time. Build your bot and bring it to RoboGames, and maybe soon you’ll be the one autographing robot parts for admiring fans!

Update 1/23/2013: BarBot tickets are now on sale!

Photo credits: Last Rites and the Electric Boogaloo by Annie Blumenberg (CC-BY-ND), Yellow art robot by Patrick Giblin (CC-BY-NC).

Help Bring PancakeBot to Bay Area Maker Faire

Pancakebot

Miguel, the great guy behind PancakeBot, a CNC pancake printer made out of Lego, is running an Indiegogo campaign to help bring the whole family all the way from Norway to the Bay Area Maker Faire. We met Miguel at the New York Maker Faire last year, and got a chance to see PancakeBot in action.

Even if you can’t support the campaign, you should check out the video to see the machine in action, cheered on by enthusiastic young pancake aficionados. And come to Maker Faire in May, where we’ll hope to see Miguel and family with the awesome PancakeBot.

Another wild Peggy 2 project: Heddatron Robot

The folks at Chibots helped the Sideshow Theatre with building the robots for their 2011 production of Heddatron that was part of the Steppenwolf Garage Rep series. For the character Billy Bot, they used a Peggy 2 as a chest display panel which could be controlled remotely along with the rest of the robot actions and behaviors during the performance.

Don from Chibots wrote:

I got to assemble it (625 LEDs!), and made some modifications to the control circuitry to accommodate needs of the remote controls.  The robots were controlled via X-Bee Pro radio transceivers coupled to BahBot MCU boards. Of course, the solidly-designed Peggy 2 worked perfectly out of the box.

The production won a Jeff Award in the Artistic Specialization category for Outstanding Achievement in Robot Design and Engineering.

Billy Bot was even called on to help with a surprise wedding proposal after one of the shows, and you can see him in action briefly in the video above.

Awesome robot work, Chibots!

Photos courtesy the Sideshow Theatre Company.

Peggy 2 with sockets

Untitled

Paul Gerhardt of Lockitron built this awesome Peggy 2 (our LED “pegboard” kit), where instead of directly soldering in all of the LEDs, they’re mounted in sockets so that they can be moved around easily.  Now, this isn’t the first time that we’ve seen a Peggy filled with sockets, but— thanks to Paul’s clever trick —it is the first time that we’ve seen it done well.

Usually, when someone fills a Peggy up with sockets, it ends up looking something like this:
IMG_0381.jpg

As you may be able to see, the usual problem with installing an array of sockets this large is that it is very difficult to keep the sockets aligned neatly. Corey Menscher made a socketed Peggy for an ITP project, and his photo above demonstrates the problem.

IMG_0401.jpg

Once you add the LEDs, small offsets in socket alignment translate into larger angle variation in the LEDs that are put into them.  We’ve usually gotten around this problem by soldering the LEDs directly into the holes, so that the LEDs are flush against the circuit board and stay level and aligned.

Untitled

Paul solved the problem by making a laser-cut acrylic overlay that fits around the sockets, holding each one squarely in position, and also providing a level surface to push the LEDs against, so that they all stay level and aligned.

Untitled

A second trick that he used is to solder all of the LED sockets into the back side of the PCB, so as to avoid any height interference with other components.  So instead of LEDs, the on the “front” side of the Peggy, you just see the tail ends of the sockets.  Then, the acrylic overlay can be just at the height of the sockets for the entire board, giving the whole thing a clean, sleek look.

Untitled

To add just one more layer of awesome, he’s hanging his Peggy on a pegboard.  (Now, we just need to route power up through the holes.)   Thanks, Paul, for sharing your clever hack.

Resistor Color Code Tattoo

resistor tat

Our good friend Jimmie P Rogers— of LoL Shield fame, amongst many of us who love Arduino and LEDs —has a brand new tattoo of the resistor color code: Black, Brown, Red, Orange, Yellow, Green, Blue, Violet, Gray, White.  I’m pretty sure that Jimmy himself has known this color code since he was in diapers, but now he has an always-present chart that he can use as a visual aid while teaching electronics.  And at five inches across, it doubles as a ruler (albeit one that will grow less accurate with age).

So, that’s pretty neat.  But two things bring this above and beyond the “usual” coolness of a geek tattoo.  First, Jimmie designed it in Processing, and second, as an open source tattoo, you can download the source code on his web site.

And for those of us who may be a little less committed: Our own favorite mnemonic for the resistor color code is “Black Beetles Running On Your Garden Bring Very Good Weather.”

Inside-out Eggbot

Here’s something we never thought of: John Fisher is using an EiBotBoard (EBB), a Raspberry PI and a camera to create “inverse panorama views” of cylindrical objects. It’s a little bit like using an Eggbot as a scanner. His in-depth article covers everything from hardware set up to code.

Hat tip to EBB developer Brian Schmalz for pointing us to this one!

Puzzle Kickstarter is a Puzzle

Roy Leban of Puzzazz, a puzzle company, is running a Kickstarter campaign for a puzzle a month for a year. The unique thing about this campaign is that it is itself a puzzle. The project video includes a whole bunch of clues related to interesting and geeky people like Theodore Gray, Nolan Bushnell, and (gasp) me! The Kickstarter puzzle is free to everyone, whether or not you’re backing the project. However, if you like the puzzle, you may want to help out the project to get the full year of puzzles!