All posts by Lenore Edman

About Lenore Edman

Co-founder of Evil Mad Scientist Laboratories.

3D printing use case: Custom parts for vintage cars

We always hear about how someday people will just print out rather than order spare parts for their cars. Here’s someone who actually does it.

When instructables user madmorrie had new door trims (interior panels) made for his 1962 Valiant, he neglected to allow for clearance for the door lock levers on the back door, so the original levers would no longer work. In the photo above you can see the end of the mounting post for the levers is flush with surface of the new panel, leaving no way to attach them.

Rather than have expensive new door trims made, he decided to make new levers. He designed the new levers with an extended splined section that could be recessed into the door trim and wrote up his experience in his instructable, Custom 3D Printed Car Parts.

It’s likely that no other 1962 Valiant owner will ever have the same problem, and that’s exactly why 3D printing is a good choice in this scenario. While 3D printing can get expensive for larger parts, when building tiny parts like these, you can save a lot of money by not paying for tooling costs.

And it turns out that 3D printing is good enough, even in low-cost materials (about $15 for the pair through Shapeways), for a usable part. Madmorrie says,

Initially I was intending to order them in stainless steel, however the plastic ones seem to be perfectly strong enough, so unless they break I will stick with them.

And, they look great!

All photos by madmorrie.

DIY Deck Ambiance with Flickering LEDs

Jack Olsen (of the awesome 12-Gauge Garage) wrote in about using our flickering LEDs to line the deck and pergola he had just built.

He says, “The LED candle effect is great, and really gives the place a relaxed feel at night.” You can read more about the deck project over at the Garage Journal forums, where he describes the build in more detail:

It has 28 real candles on it that I’ve hollowed out to accommodate flickering LED lights. It’s pretty convincing.

I have a pair of 3 v power supplies — each feeds half the light set. They’re plugged into a switched outlet with wire running down along the edge/underside of the deck and up through one of the pillars, then sneaking around the back of the wooden frieze thing and into holes drilled in the backside of the frame.

He even sent us a before shot, so you can see just how from-the-ground-up building the deck was. Thanks for sharing your project with us!

All photos by Jack Olsen.

Designs for Eggbot by RoboGenius

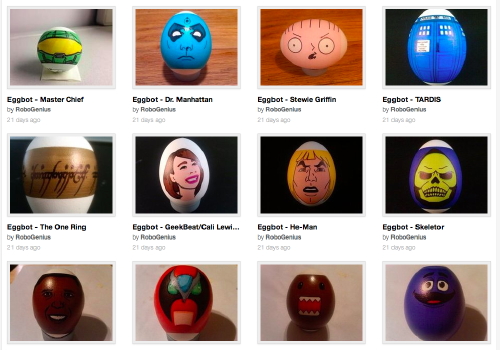
We’ve been watching the work of RoboGenius for quite some time. He has created some of the neatest non-geometric work anybody has done on the Egg-Bot. Recently, he uploaded a number of his designs to thingiverse, which means you can try them out, too. He has also been posting great pictures of them to flickr. When asked in the Egg-Bot user list how he created them, he posted:

The short answer is that it’s all done line by line in Inkscape.

The slightly more tedious answer is that it starts with an image (generally something off the web, or that has some significance to me), then I import that image onto my 3200px X 850px template in Inkscape and position it where I want it on the egg/ball. I then take a look at the image and decide how many color layers I’ll be needing for the plot and add those to the project, naming them sequentially followed by the color I use for the layer (for example: 1 – Yellow, or 5 – Black). I always begin with the lightest colors first, and generally end in black. Then it’s simply a matter of tracing over the picture on the correct layer using the bezier line tool (Shift + F6), and bending those lines with the path editing tool (F2). Once I get the basic lines created, I’ll create and fill any solid shapes using the EggBot Contributed Hatch fill extension (spacing should be set to 6 for eggs). To add shading, you simply go over the same places a couple of times with the same color, which can be achieved with Copy and Paste, and occasionally the shading can be enhanced by altering the angle of the line to match the angle of the shape or intended shadow (the Master Chief design is a good example of this technique).

That’s pretty much it. To finish off the project, I like to color all of the lines in a layer to match the marker used in that layer, then delete the layer with the picture in it.

Thank you for generously sharing both your designs and your techniques, RoboGenius!

Senko [Flash]

Tatsu Iida, a member of oxoxo [zero by zero] wrote in to tell us about the interactive LED installation entitled Senko [Flash] which they showed at the Tokushima LED Art Festival in April.

senko-body

They used a Peggy 2 to drive a field full of LED illuminated spheres, along with IR sensors to detect visitors entering the array. Each new person would trigger a new sphere to light up and move through the field.

?? [Senko] - Tokushima LED Art Festival

This is the largest installation we’ve ever seen based on the Peggy 2.

?? [Senko] - Tokushima LED Art Festival

Thanks for sharing your incredible project with us!

Links to many more Peggy 2 projects are on the wiki.

Bay Area Maker Events this Week

This is a fantastically busy week in the bay area for makers and hardware folk.

On Tuesday and Wednesday, the Hardware Innovation Workshop will be held at San Mateo College. Windell will be speaking on Wednesday afternoon; check out the agenda to see the full lineup of presenters.

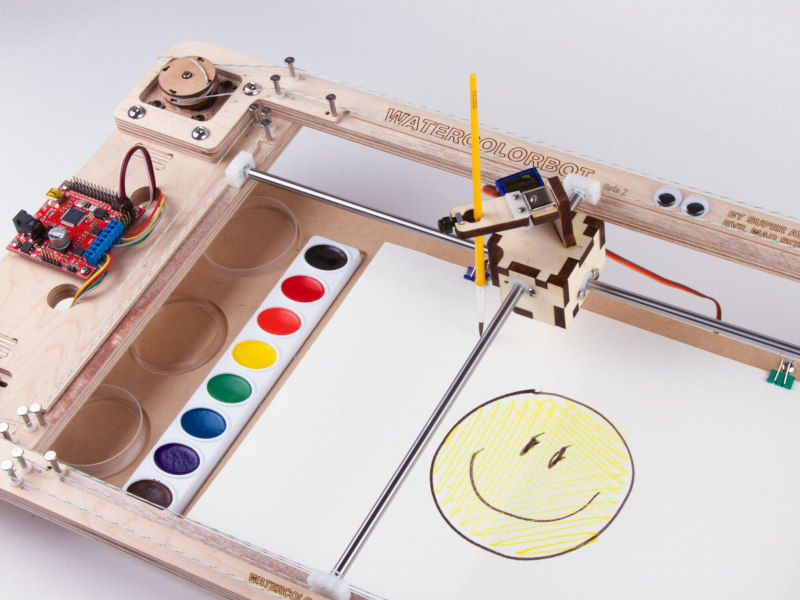
On Thursday, we’ll be participating in Maker Faire Education Day with Super Awesome Sylvia and the WaterColorBot. If you’re a bay area teacher, you and your class should be there! If you’re a bay area student, make sure your teacher knows about this!

On Saturday and Sunday, the Bay Area Maker Faire is in full swing at the San Mateo County Event Center. We’ll be there with Super Awesome Sylvia and the WaterColorBot. Windell and I also mentor FIRST Robotics team 3501 from Fremont High School in Sunnyvale, and they will be there with their robot, Oddjob. I will be participating in the Parenting Young Makers panel on the Make: Education Stage at 2:00 pm on Sunday as well. The full Maker Faire schedule has been posted, and advance tickets are still available. If you’re planning on driving, check out the list of free parking lots with shuttles or in walking distance. 110,000 attendees were there last year— not a small party!

To spread the celebration a little further, we’re holding a DIY Fever sale in our shop now through Monday.

White House Science Fair Roundup

President Obama tries out the WaterColorBot. Photo credit: State Observer
 We’ve gotten to see Super-Awesome Sylvia and her WaterColorBot in a variety of news sources following her journey to the White House Science Fair on Monday:

Congratulations to Sylvia on her participation in this fantastic event! We’ll add to this list as we find more articles and links.

Art Controller Thermostat

Thermostatic Ventilation Fan

Jonathan Foote over at Rotormind is at it again with our Art Controller. This time, he is using it to thermostatically control a ventilation fan.

board closeup

He has wired up a TC74 temperature sensor on board and reprogrammed the microcontroller to trigger the relay when a temperature set point is reached. The temperature is set using the DIP switch. He has posted his code and shared in detail all of his modifications. Head over and check it out!

Robotics Week and Upcoming Events

We are right in the middle of National Robotics Week, which runs April 6-14 and starts a string of events all over the country for makers of all kinds. We’ve listed a few upcoming highlights below:

You can look for events in your area on the National Robotics Week Events site and the Maker Faire Map site—feel free to add your favorites in the comments. We’ll be exhibiting at RoboGames and helping Super Awesome Sylvia show off the Watercolorbot at Maker Faire. We hope to see you there!