All posts by Windell Oskay

About Windell Oskay

Co-founder of Evil Mad Scientist Laboratories.

Drink Making Unit 2.0

Drink-Making-Unit-2.0 - 22

Barbot 2011, the cocktail robotics exhibition, is happening on Friday and Saturday nights this weekend– April 1 and 2 –in San Francisco. If you haven’t been to one of these events (and you happen to like both cocktails and robots), let me tell you: you are missing out.

Last year we built the aptly named Drink Making Unit for the event. The Drink Making Unit used three –ahem– food-safe pumps to craft white russians, and was quite a hit at the show– especially amongst people who recognized the pumps.

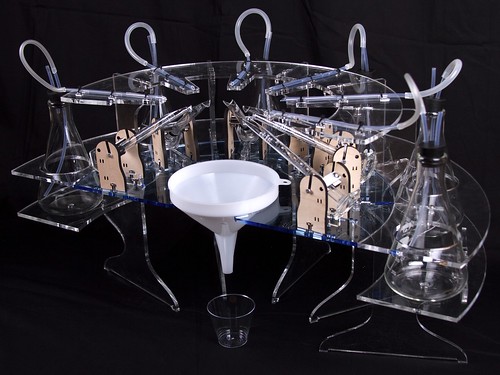
This year, we’ve designed a brand new bartending machine, Drink Making Unit 2.0, which we are pleased to unveil today, and unleash upon the world this weekend.

Aside from the once-again-apt-but-not-very-descriptive name, Drink Making Unit 2.0 has very little in common with last year’s machine. The mechanism is all new, and features elements borrowed from sources as diverse as pet stores, chemistry labs, and Japanese gardens. It dispenses any six fluids (up from three), in metered and selectable quantities, and also sports an all-new extra-snazzy control panel. Continue reading Drink Making Unit 2.0

ISP Shield Kit

ISP Shield

The Evil Mad Science ISP Shield is a new open source hardware kit that we’re releasing today.

It lets you use your Arduino (or shield-compatible clone, such as the Diavolino) as an AVR ISP programmer, for example to burn bootloaders onto “raw” AVR chips, directly within the Arduino programming environment, either in the provided ZIF socket or on an external target board.

You can read more about this process here.

The circuit is designed to be compatible with the “Arduino as ISP” option in recent versions of the Arduino IDE. It is based on a number of prior hardware implementations, most closely the version by Andre Knoerig at Fritzing.

Complete documentation, including assembly instructions, design files, and basic usage information is available on the Evil Mad Science Wiki.

Open Source Hardware logo: Up for public vote!

oshw logo candidate

After an initial round of judging 129 entries (Whew!), The effort to establish a logo for open source hardware has moved onto the next stage. We’ve narrowed the field down to ten finalists. And, voting has been opened to the public, so go vote!

We’re putting our own vote in for “#95,” the geared logo by Fred PRATE, shown above with variations. It’s one of the few that suggests both mechanics and electronics, and it will look darn good milled into a hunk of metal or silkscreened onto a circuit board.

Gaunt and Glimmering Remains of Gastropods

1. Wetlands

Here at the southern end of San Francisco Bay, tall grasses and other slender plants thrive around the edges of our often-salty marshes.


2. Tall grass

Towards the end of every summer, as the grasses start to dry out, you’ll sometimes see a gleaming white jewel, shining from the top of a stem.


3. Mysterious shiny thing

And if you look closer, it becomes quite a puzzle what that might be. A chrysalis? A gall of some sort?


4. Isolated, white

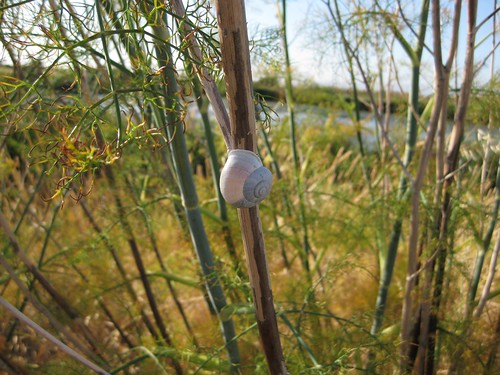
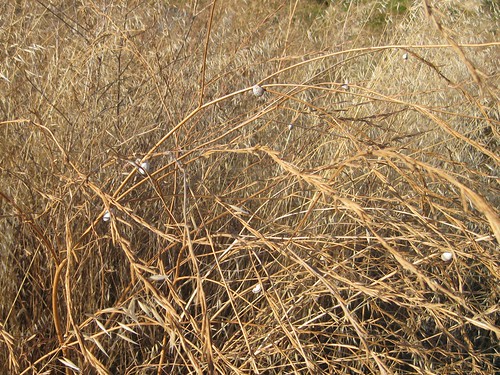
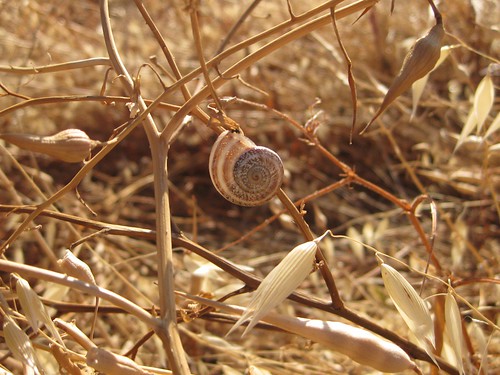
But it turns out to be both simpler and stranger than that. The little jewels are actually the desiccated shells of brown garden snails, bleached by the summer sun.

5. Snails!

The common garden snail in this area is helix aspersa, the culinary snail of France, imported here in the gold-rush era by a Frenchman who intended to sell them as food. Normally, they are chestnut to ebony in color, with lighter striations.
4. At least eight

But the snails that we find in the grasses– I count at least eight in this picture –have dried up after their food sources, and have been left to sit in the sun for much longer than they would like. Seems clear enough that they climbed up the stem for a leafy snack while the plant was still green, but didn’t make it down in time.
9. Faded

7. Bleached

8. Anise

Depending how long it’s been, the shells may still be striped, faded, or fully bleached. In some cases the shell is long empty and backlit by sunlight. In others, the resident has only recently passed.

In some cases the surface luster weathers shiny like a jewel, catching your eye from a distance. And that’s how we end up with ornamented grasses, glittering with the gaunt remains of gallic gastropods.

Open Source Hardware Logos

Hey internet: You’ve got some good artists out there, and we could use a little help, right now!

Today is the last day to submit entries for the new Open Source Hardware logo — There are over 100 entries so far, and you can enter your own sketch by posting it there in the forum.

The official requirements are that it is (1) easy to print/see on a circuit board or schematic document and (2) that it signify “open-ness.” To part (1), I’d add, it should be easy to carve/see milled into a block of aluminum– open hardware isn’t just about electronics! –and to part (2), I’d add that locks and keys aren’t always the best way to indicate that something is “open.” (Locks are often shut. There are plenty of things that never are– Klein bottles come to mind.)

So, now is the “last minute” — and time to send in your own entry. We’ve got a whole lot of entries that won’t look good on a circuit board (or milled into aluminum), and a whole lot of entries with locks and keyholes that don’t necessarily send the right message. Care to lend a hand?

PeggyDraw 2

peggydraw2


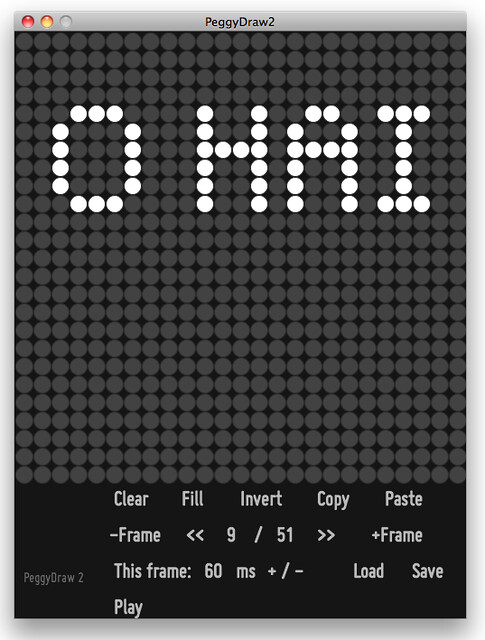
We are pleased to finally release PeggyDraw 2, a little bit of long-delayed software. It’s a Processing application that you can use to draw simple 1-bit animations on a 25×25 grid. The neat bit, of course, is that you can press the “Save” button, and the file that it saves is actually an Arduino program, ready to be programmed onto a Peggy 2.


You can download PeggyDraw 2 right here. It’s fully built in Processing, so that it works on Mac, Windows, and Linux. Also, open source, designed to be adaptable.
Some things to note about this program:


  • If you don’t have Processing on your computer, download it here.
  • The editing interface is easy point-and-click. Try it out to see how it works.
  • You can individually pick different delay times per frame, as low as 20 ms, or give every frame the same duration.
  • The frame data is stored in Arduino program memory, so you’re only limited by the flash memory in terms of frame number– over 250 frames fit on an ATmega328P.
  • The output file is located in the PeggyDraw2 sketch directory, inside a directory named “PeggyProgram” “data.” The file is called “PeggyProgram.pde.”
  • You can both save a file and later reload it for editing.
  • The formats used in PeggyDraw 2 should be easily adaptable to write sequences for other types of LED grids, even of different aspect ratio and control software.

And, special thanks to Matt Mets, http://cibomahto.com for assistance with Processing.
Update, 3/19/2011: We’ve posted a new version, PeggyDraw 2 v. 1.1, available here. Note that the output file is now stored in the “data” directory, not a separate “PeggyProgram” directory.

The CO2inator

A guest project by Rich Faulhaber, contributing Evil Mad Scientist.

Setup

“Infusing unsuspecting whole fruit with gaseous CO2 in the entire Tri-State Area!

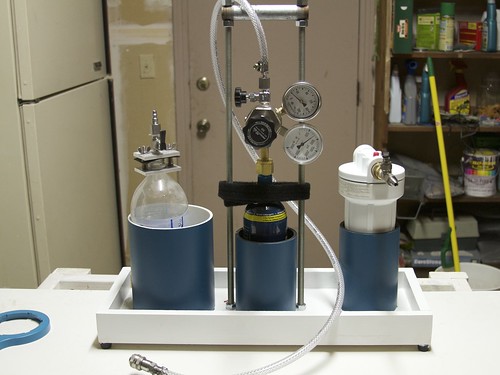
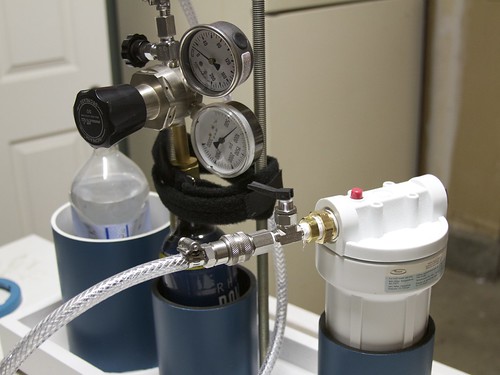
In an effort to make fruit fun for the kids, I built a carbon dioxide injector from parts in my garage with the purpose of carbonating whole fruit! With a common house water filter housing, a 16 Oz paintball CO2 canister, an old gas regulator, and some miscellaneous valves and fittings, I was able to bring this fizz fruit apparatus to life, and the kids love the results.

The principle
Carbon dioxide dissolves well in water, hence the reason you find it as the source of fizz in all your favorite soda drinks. When you open your soda and let it sit out on the counter you will find that after some period of time the soda loses its fizz and becomes “flat.” The rate at which the drink loses its fizz depends on pressure, temperature and the surface area of the liquid and the environment. Skipping the thermodynamics lecture, let me just tell you that the process works in reverse as well. To reverse this process, one needs only to have a high pressure CO2 environment, a medium to infuse (i.e., the fruit) and enough time to let the gas diffuse across the fruit skin and dissolve into the water inside. Refrigerating the fruit helps tremendously in the process as well.

Valve

Parts list


  • 16 Oz paintball cylinder (or a more proper CO2 tank if you happen to have one)

  • Gas Regulator
  • Household water filter housing
  • Some hose
  • Toggle or ball valve
  • Miscellaneous fittings to hook it all up
  • Fruit

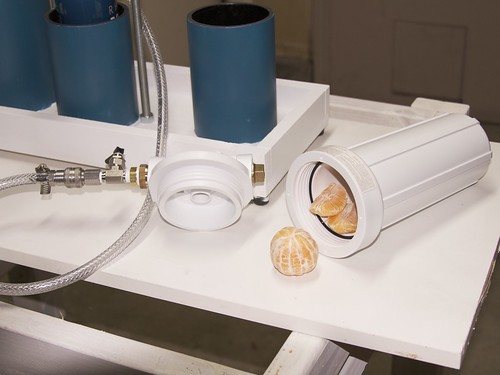
This type of water filter housing is designed to withstand water pressures in excess of 100 psi, and it comes with two ports and an o-ring seal. These can be bought for about ten dollars at Lowes or Home Depot. Its ports are standard 3/4-inch type. Use Teflon tape (plumbers tape) on all the threads. Thread in a plug on one side and a valve on the other. I used a toggle valve with a quick disconnect to make everything easier. The hose can by any standard type rated for at least 100 psi. Small bundles are available in the plumbing section of your hardware store.

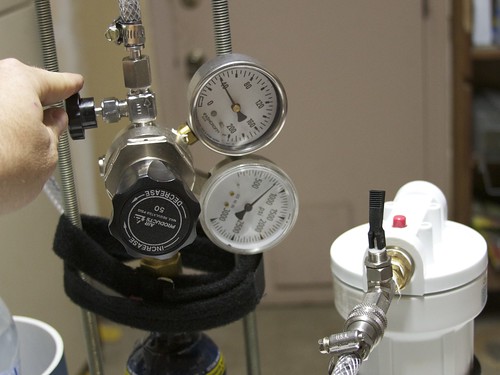
For gas handling I used an old single stage regulator. These can be quite expensive new but often times you can find deals at garage sales or in surplus stores. You don’t need anything fancy, just something to step down the pressure to something manageable– well below 100 psi. My CO2 source is a standard-issue paintball cylinder.

Pressure


Procedure:


  1. Pre-chill the fruit in the refrigerator. Get it nice and cold. My favorites are grapes, oranges and blueberries. However, just about any fruit with a large water content will work.

  2. Open the house water filter by unscrewing the lid. Place your cold fruit inside.

  3. Connect the CO2 tank to your water filter housing. This is where the quick disconnects come in handy.

  4. Adjust the regulator output to about 40-60 psi, the higher the better but make sure all your connections are extra tight and sealed or “it might get dangerous.” If you think you have a leak somewhere, you can apply some soapy water where you think the leak is and look for bubbles. If you see bubble just tighten until they stop forming.

  5. Start pressurizing the house filter by opening the toggle valve. On top of the water filter housing there is a pressure relief button. Depress this while you fill to get some of the residual air out.

  6. Once pressurized, shut the toggle valve and disconnect the CO2 line. You can store the unit in the fridge or somewhere out of sight.

  7. Then, you wait. Depending on the fruit, temperature, and pressure, carbonation should occur between 20-60 minutes. If you go too long at too high a pressure the skin of the fruit can burst and it will be a big mess, if you go too short and at too low of a pressure, the results will be unimpressive. Experiment with your fruit, pressure, and duration until it suits your tastes.

  8. Open the toggle valve to release the pressurized gas then unscrew the lid to the housing and enjoy your newly carbonated fruit.

Fruit

And of course, the kids love the “poppy fizz” inside the fizzy fruit.

Open Source Hardware Definition, v 1.0 released

It’s a big day for Open Hardware.

Following September’s Open Hardware Summit, we’re pleased to help announce the release of version 1.0 of the Open Source Hardware Definition.

While this is a “1.0” release, Open Source Hardware is an evolving field, and future releases are expected. The real milestone here is that we now have a first benchmark for evaluating possible open source hardware licenses– and we look forward to being part of that process.

Moving forward from here, some steps if you’d like to get involved:


  • Endorse the definition, if you’d like to put your weight behind it.
  • If you have feedback, please join the mailing list to talk about it. Hopefully a version 1.1 will be coming in the near future.
  • Help out with the OSHW logo selection process. You can submit a new one, or look at those proposed.
  • Show your support for OSHW by applying the definition to your projects

See also, release announcement at openhardwaresummit.org.

Hershey Text: An Inkscape extension for engraving fonts

header-fonts2

Hershey Text is an Inkscape extension that can render a line of text in one of several stroke-based “engraving” fonts. This extension solves a persistent problem, and one which we have come across in many different contexts: How to easily create simple and readable vector representations of text.

Quick start: Download and install the EggBot extensions for Inkscape, which now include Hershey Text. Much more information follows.

Continue reading Hershey Text: An Inkscape extension for engraving fonts