Category Archives: CNC

CNC Dragonfly Barrette

Dragonfly Barrette

When I saw Simone from Othermill running her machine this weekend, I told her about an idea I had for a metal dragonfly hair clip. She quickly grabbed the file from Sam DeRose’s Light-up PCB Pins tutorial. After carving the texture and doing the cutout, the only other tools needed to complete the project were a pair of pliers to bend the wings and some glue to affix it to a clip. It turned out great!

Ostrich EggBot 2.0

Ostrich EggBot
Ostrich EggBot

We’ve just released version 2.0 of our Ostrich EggBot kit!  This is the giant size EggBot. Like the smaller models, it’s a machine capable of drawing on the surface of all kinds of spherical and egg-shaped objects up to 6.25 inches (15 cm) in diameter, including large ostrich eggs.

This chassis of the new version is CNC machined from melamine-faced MDF, and laser engraved with markings and calibration scales. (The previous version was made of plywood; you can read about it here.) We’ve also updated the graphics, and rolled in a number of subtle improvements based on user suggestions and our own extensive experience with the machine and other members of the EggBot family.

Ostrich EggBot Ostrich EggBot

With a relatively large chicken egg chucked into the holders, you can get a better sense of scale. (An ostrich egg is a terrible object to suggest a sense of size!)

The tailstock (the sliding portion of the right hand side) has been slightly redesigned for higher stiffness and better ease of use. The bulk of the stiffness in the directions that we care about (that is, in the directions where the chassis material is not strong) derives from the steel angle brackets, and the new tailstock helps to reinforce that for better overall rigidity.

Ostrich EggBot

One of the best things about the new chassis material is that it laser engraves particularly well, giving high-contrast, highly readable adjustment scales on the sides. And that makes it all easier to use in practice. All considered, this has turned out to be quite a nice little upgrade.

A Requiem for CandyFab

Coil

The CandyFab 4000, 5000, and 6000 were three early DIY 3D printers that we built in the years 2006 through 2009. They worked by using hot air to selectively melt and fuse granulated media, and were capable of producing large, complex objects out of pure sugar, amongst other things.

CandyFab is no longer an active project — it hasn’t been for a few years. But the time has come to retire it officially and document its history. We have taken some time to write an in-depth article about the history of the CandyFab project, the different CandyFab machines, why and how they were built, what they were capable of, and the lessons that we learned in the process. Have a seat; we have a story to tell.

The CandyFab Project: 3D Printing in Sugar. Big, DIY, and on the cheap. 2006 — 2009.
Link: candyfab.org

Introducing the EggBot Pro

EggBot Pro

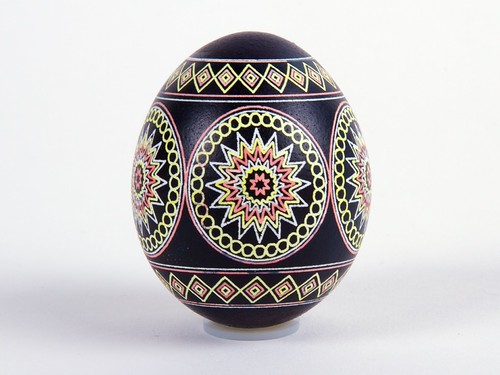
An EggBot is a compact, easy to use art robot that can draw on small spherical and egg-shaped objects. The EggBot was originally invented by motion control artist Bruce Shapiro in 1990. Since then, EggBots have been used as educational and artistic pieces in museums and workshops. We have been working with Bruce since 2010 to design and manufacture EggBot kits, and our well-known Deluxe EggBot kit is a popular favorite at makerspaces and hackerspaces around the world.

Today we’re very proud to release the newest member of the family: the EggBot Pro, a near-complete reimagining of the EggBot, designed for rigidity, ease of use, and faster setup.

EggBot Pro

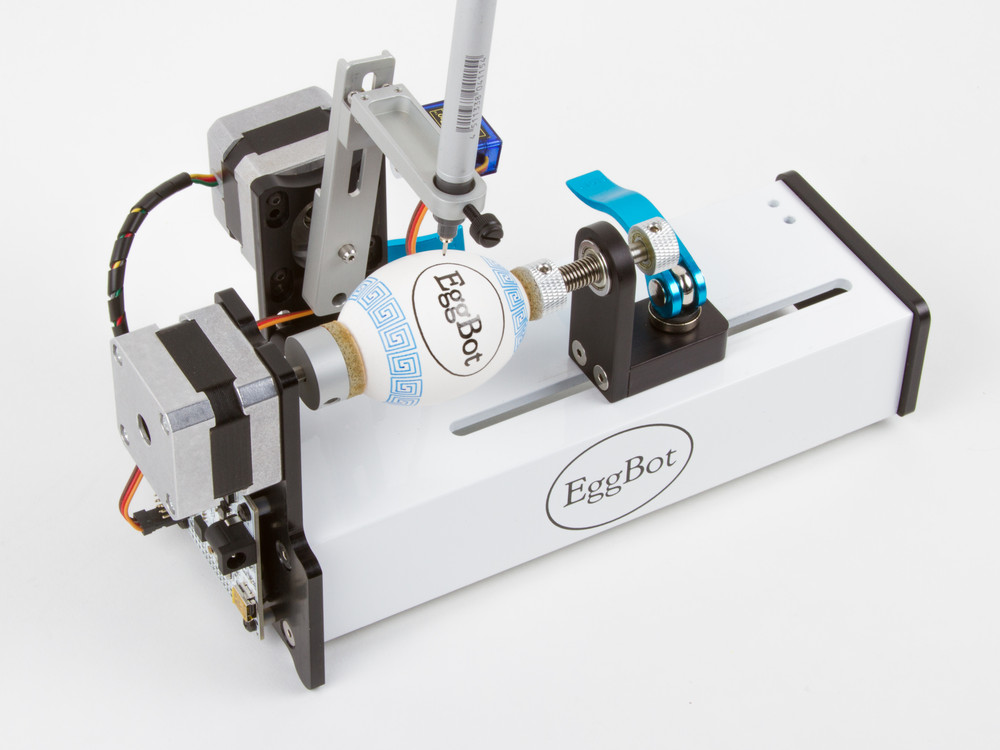
The EggBot Pro is as sturdy as can be: Its major components are all solid aluminum, CNC machined in the USA, and powder coated or anodized. (And isn’t it a beauty?)

The most common mechanical adjustments are faster with twin bicycle-style quick releases, and repositioned thumbscrews for easier access.

EggBot Pro

The frame also has an open front design that gives much better visibility while running, and greatly improved manual access when setting up.

EggBot Pro

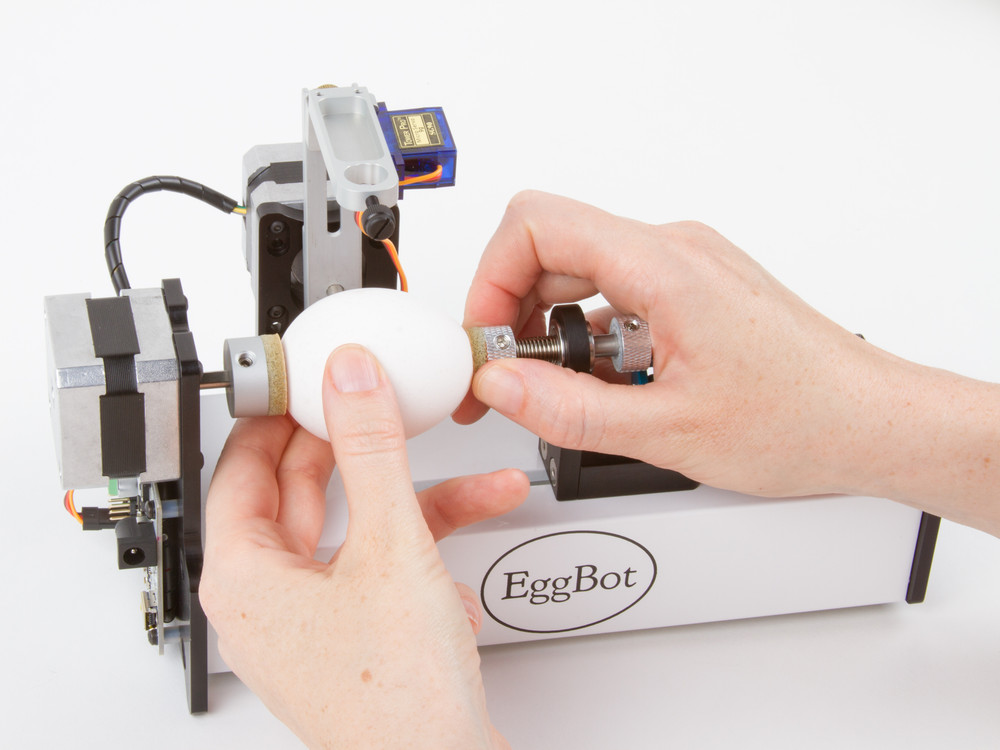
And, it comes built, tested, and ready to use — no assembly required.  Assuming that you’ve installed the software first, you can be up and printing within minutes of opening the box.

The EggBot Pro begins shipping this week. We’ve also put together a little comparison chart, so you can see how it fits in with the rest of the family.


New Winches for WaterColorBot

We’ve just given the WaterColorBot a little bump up to kit version 1.5. The new version now comes with a pair of beautifully machined aluminum winches.

The winches are precision cut on CNC machines and anodized clear. We add a few extra little parts (flat-head rivets to wind the winch around, screws, and a stamped and polished stainless steel “clamp” to hold the string end), and wind them with the same “100 pound” Spectra cord as we did before.

We described the process of making and winding our older laser-cut wooden winches in our blog post about the making of the WaterColorBot, and again in our post about the  winch cutting jig. For better or worse, transitioning to the new aluminum means that we’re no longer using our older wooden winches that we described in those blog posts.  But in the end, these new winches are a better, more elegant solution.

 WaterColorBot kit version 1.5 is now shipping from the Evil Mad Scientist Shop.

Pen tests for drawing machines

Jenslabs has published a thoughtful and thorough evaluation of a number of currently available rollerball and gel pens. He tested them using his Circlon machine.

One thing that anyone who as ever built a drawing machine realizes, is that to get quality results you need a quality pen. There are millions of pens out there, but after a little trial and error I realized that rollerball pens or pens with gel ink are the best pen types for my machine. Both rollerball and gel ink pens use a water based ink that is less viscous then the oil based ink used in ballpoint pens. The Circlon machine sometimes move very fast, so the pen has to be able to release enough ink to make solid lines even at high speed.

This is an excellent resource for folks with other drawing machines, such as Egg-Bots and WaterColorBots. We’ve linked to it from our page about choosing pens for the Egg-Bot as well.

Electro-Kistka: Alternate In-Place Egg Dyeing Technique

After seeing our recent post on dyeing in eggs in place with the Eggbot, Ragnar posted instructions in the forums for an alternative egg dyeing technique.

It involves pre-installing a plastic dyeing bag at the time of positioning the egg in the Eggbot. Full instructions (with more photos) are in the forum post. Thank you for demonstrating this technique, Ragnar!

Electro-Kistka: Dyeing an Egg in Place?

Kistka-brush 11

In our annoucement article about the EggBot Electro-Kistka — the hot wax dispenser for the EggBot — we noted that it can be challenging to reposition an egg after taking it out to dye the egg between wax layers.

As an alternative suggestion, reader Dan commented:

Could you leave the egg in the EggBot and paint on the first layer(s) of dye with a brush? Then dip the egg for the last layer to get the ends covered.

Well, let’s try and see how it turns out!

Continue reading Electro-Kistka: Dyeing an Egg in Place?