
Via @programmer1200 on twitter, “…adding a microswitch and an @arduino in preparation for a laser addition.” We’ll be keeping our eyes on this WaterColorBot!


Via @programmer1200 on twitter, “…adding a microswitch and an @arduino in preparation for a laser addition.” We’ll be keeping our eyes on this WaterColorBot!

From the Lenoir News-Topic, middle school students got to build Egg-Bot derivatives at their local hackerspace:
“I think this is one of the best field trips I’ve ever been on,” one of the sixth-graders said, unprompted by any of the adults (or reporters) in the room. “This one, you actually build something.”
Our friend Doc Pop is running a kickstarter campaign for his new album Destroy All Presets to release it on a special edition Gameboy Advance cartridge. Even if you don’t back his campaign, the video, with its retro-style album ad, is definitely worth watching!

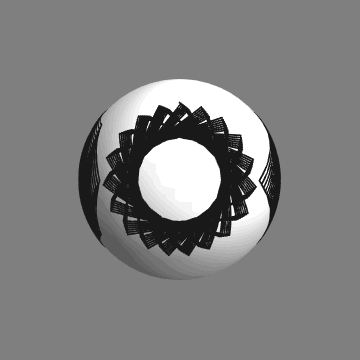
Over on the Wolfram Blog, they’ve posted the winners to the Wolfram Technology Conference Egg-Bot Challenge:
We have a programming competition every year at the Wolfram Technology Conference, which in past years was the Mathematica One-Liner Competition. This year we held the Egg-Bot Challenge, a change of pace to give attendees a chance to exercise their graphics skills. The idea of the competition was to use Mathematica to generate designs that could be plotted on spheres…
Above is first place winner Jan ?íha’s composition of sinusoidal motifs, and below is second place winner Michael Sollami’s spirograph designs. Head over to see the rest of the entries.

Ann posted instructions in our forums for creating an electric kistka (wax pen) for the Eggbot for traditional Pysanky egg dying techniques. She used nichrome wire, krylon tape, a modified kistka, and a 2xAA battery holder with a switch and described how to mount it in the Eggbot. She posted a couple of designs to Thingiverse demonstrating the technique including the rose design pictured above.

For a Humpty Dumpty design, she wrote up how she made it:
Using eggbot and custom electric kistka, plotted the Humpty Dumpty picture and text on an egg. First plotted outline, dyed brick, colored in bricks by hand with kistka, dyed blue.
You can check out her other designs for the Eggbot on Thingiverse.

Here’s a little project that we’ve been working towards for a long time: a custom-painted leather flight jacket (“bomber jacket”) featuring the “Classic Lego Space” logo. (Yes, I totally spent years serving in the Lego space corps!) And, if you’ve ever wanted to make your own painted leather jacket — whatever the theme — here’s how to do it.
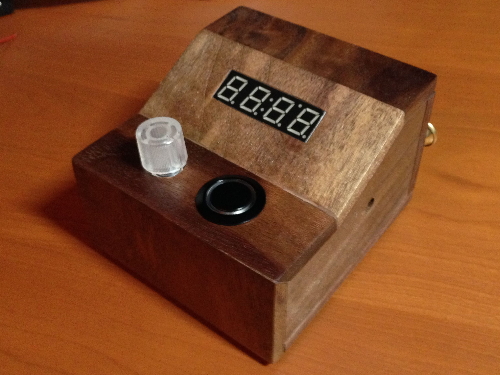
Dave wrote in to tell us about the kitchen timer he made:
I just wanted to say thank you for putting together such a great site and set of products. I’m a newbie and after about 4 months o studying your articles and using the Diavolino as my development board, was able to make a cool little kitchen timer for my parents this Christmas. I definitely could not have done it without your articles and products.
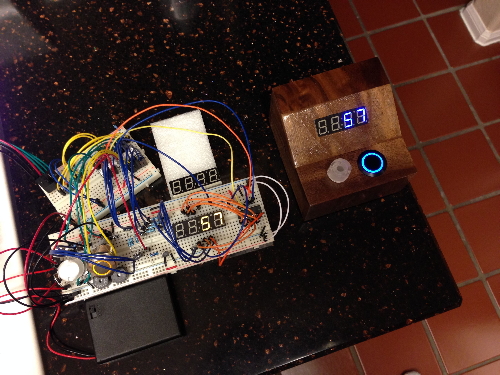
He documented the project with a series of videos (youtube playlist) showing his progression through building it. Shown above is the breadboarded prototype next to the finished timer.
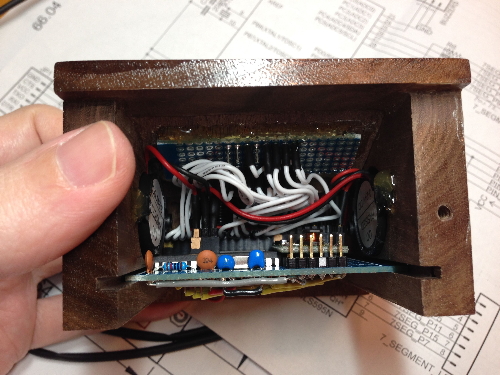
Thanks for sharing your project photos and videos, Dave!
Ryan Lane posted a couple of short videos of the WaterColorBot drawing a Storm Trooper and Seattle with markers. He traced a photo of the Storm Trooper and applied a half-tone filter before plotting with the WaterColorBot.
[Video no longer available]
Our Peek-O-Book made an appearance in this segment on The Art of Tinkering on the news.
