Evil Mad Scientist Open House, August 12

If you’re in the San Francisco Bay Area next Monday, we hope you’ll join us for an open house:

When: Monday, August 12, 5 pm ? 9 pm
Where: Evil Mad Scientist Laboratories
175 San Lazaro Ave, Suite 150
Sunnyvale, CA, 94086

Come see the WaterColorBot in action (just a few days before the end of our Kickstarter campaign!), meet minor internet celebrity Zener the cat, and share in food and conversation.

Using Artist Grade Materials with the WaterColorBot

watercolorbot paints

One of the questions that we’ve had on the WaterColorbot is about its ability to use higher-quality materials. And in particular, can you use it with fine (artists’) watercolor paints?

The WaterColorBot comes with a starter set of Crayola watercolors. This kind of paint set is great for kids and great for learning how to use the WaterColorBot. And in the United States at least, it’s also easy to obtain direct replacements from your local office or art supply store.

But on the other hand, watercolors like these do not offer the depth or range of color nor the archival quality that professional artists expect and require. And, replacement paint sets may not be so easy to find overseas, or even in less urban areas of the US. Fortunately, you can use the WaterColorBot with other paints, and we’re working on expanding the number of different ways that you can.

watercolorbot paints

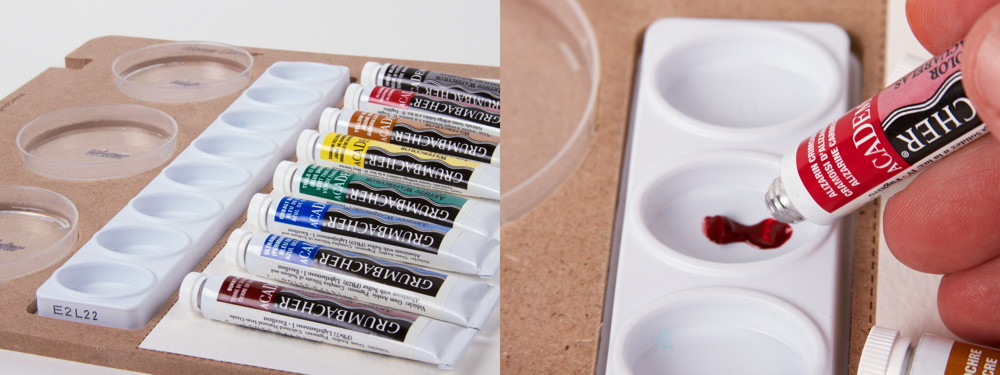
The first, easiest solution is to note that the Crayola paint set actually comes with (well, in) a perfectly-sized paint palette; simply rinse out the remaining paint with cold water.

The empty Crayola palette can be reused with tube-based watercolor paints, which are available at art supply stores worldwide. Like dry (pan) watercolors, tube based watercolors are available in many grades, from very inexpensive to fine artists’ watercolor, and in a truly impressive range of colors.
watercolorbot paints

While the the empty Crayola palette is perfectly serviceable, it is a bit flimsy, and we are also planning to offer a couple of more durable permanent palettes as optional accessories for the WaterColorBot.

watercolorbot paints

Here is the first of those accessories: A milled plastic palette for use with tube-based watercolor paints. It’s tough and permanent with eight oval wells.

watercolorbot paints

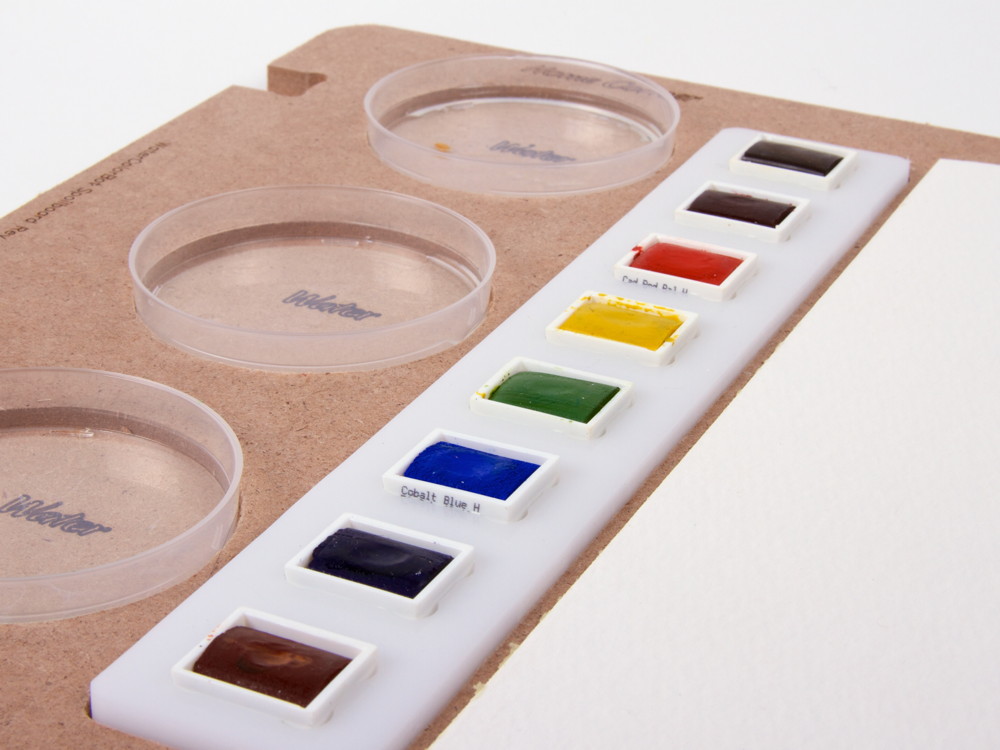
For artists who prefer to paint from pans (dry paint), our second accessory is a palette that cradles up to eight “standard” half pans, which are one of the preferred shapes for artists’ watercolors. The word “standard” is in quotation marks because there is actually quite a range of variation in the size of half pans; this particular palette is sized for Winsor & Newton (and Cotman) watercolors. We also plan to offer other holders to fit half pans from other manufacturers.

And what about paper?

The WaterColorBot is designed to fit 9×12” paper, which is one of the most common sizes for watercolor paper. Heavier and finer grades of paper (140 Lb, 300 Lb) can be used without issue, and standard methods for affixing paper to the board– such as tape and tacks –will work just fine. Larger sheets of paper can be cut down to fit, and smaller paper– including A4 and US letter –can be used, although you may need to pay attention to the margins.

Marking Klein Bottles with the Eggbot

Untitled

We were lucky enough to have a visit from Cliff Stoll, geek celebrity and proprietor of Acme Klein Bottle. Acme is the finest source of Klein bottles on the internet.

Cliff came with an esoteric dilemma: how to engrave a glass Klein bottle. Acme Klein bottles are blown from borosilicate (Pyrex) glass, which has a low coefficient of thermal expansion, which means that the usual way of engraving a curved glass surface—laser engraving—doesn’t actually work.  With more common types of glass, you can use a laser engraver to etch anything you want into the surface. But with Pyrex, the surface simply melts unevenly rather than creating the microfractures that give an etched appearance.

Untitled

So how would you etch the curved surface of a Klein bottle? It turns out, to our surprise, that it is remarkably easy to do it with an Ostrich Eggbot fitted with a diamond engraver attachment.

There was one complication, which is that a Klein bottle is a funny shaped object! In order to fixture the Klein bottle in the Eggbot, we made a couple of extra large couplers—much larger than the tiny pads normally used to hold the ends of an egg—with EVA foam rubber pads on their surfaces. The extra large couplers held the Klein bottle securely for rotation.

Untitled

Untitled

We did some initial tests with Sharpie and a medium sized Klein bottle to make sure our fixturing worked well.

Untitled

And then we hooked up an engraver for a real test.

Untitled

Here’s what the Klein bottle looked like after engraving. Not being particularly creative, we etched the word “KLEIN” into the side.  Because the Klein bottle is made from thick borosilicate glass, it takes engraving remarkably well. It is a much more sturdy object than the fragile Christmas ornaments that we have engraved in the past.

Untitled

While we can’t imagine that it is a major market segment, the Eggbot seems to be ideal for working with Klein bottles (insomuch as anything can be perfect for working with a closed, non-orientable, boundary-free manifold). But regardless, it’s quite wonderful to find an unexpected application like this, where our little robot can solve a real-world problem that we had never even considered.

WaterColorBot at Dorkbot SF, 7/31

Dorkbot SF, the San Francisco chapter of Dorkbot, is having its next meeting tomorrow, July 31. And, we will be bringing along the WaterColorBot for show and tell between the main acts. So if you’re in the area, this would be a great opportunity to come and see the WaterColorBot up close and personal.

Dorkbot is a loosely organized sporadic meeting of people generally interested in “Doing Strange Things with Electricity.” The event will be at Otherlab starting at 7:30 pm. You may know Otherlab from their wonderful Othermill recently launched on Kickstarter. Anyone can attend and admission is free, although there is a suggested donation.

The Mug Marker

Untitled

Untitled

Don McRae recently stopped by our shop last week to show off his homebrew CNC project, the “Mug Marker” — a wonderful little cardboard robot that can draw on mugs.

Much like the Mug Plotter on Instructables, it uses the same EBB controller board and stepper motors as the Eggbot, but with linear motion for the pen instead of rotation. However, unlike that version, Don has incorporated the same winch-drive mechanism that we use on the WaterColorBot to provide motion for the linear axis– meaning that it can go fast or slow, with very good accuracy.

Don laser cut the large white winch on the back of the machine from acrylic. It controls a string that pulls the pen carriage back and forth as it rides on a pair of rods:

Untitled

Untitled

The pen holder itself slides into some additional bearings, and has a small protrusion on the back that rests on the servo horn, allowing it to be lifted up or lowered down.  Like the Eggbot’s pen-lift mechanism, this mechanism only (actively) lifts the pen, which means that it can ride over uneven surfaces, or plot on mugs with variable diameter.


Untitled

Underneath the pen carriage, the opening of the mug fits onto a three-jaw coupler on the motor shaft, and the base of the mug is held against a rubber faced spring loaded plunger. Small copper tubes are used as bushings to allow the coupler pieces to rotate inward or outward to allow mugs of differing diameters to fit on. A little silicone on the surface of each of the three parts provides a gripping surface, and the upcurved lip keeps the mug from sliding too far.

Untitled

Looking down through the pen carriage, you can see the mug below held in the coupler.

Untitled

The chassis of the machine is made from cardboard, either hand or laser cut to slot together, and held together very cleverly with pins. The whole machine is put together from a combination of off the shelf parts and found materials, many of which are laser cut for the correct shape. For software, Don uses the Eggbot Inkscape extensions with very reproducible results.

Thanks to Don for bringing it by and letting us take pictures!

Foul Play in the Floral Department

Untitled

While walking through Home Depot on an unrelated mission, we happened to walk by a display of succulents, and were struck by the unusual blue color of some of the flowering cacti.

Untitled

But on closer inspection, we could see what was really going on: the flowers on the top were attached… with glue. In fact, most of the flowers on the cacti and succulents were glued on.  Some of them, like this winner here, even had globs of glue spilled down onto the spines of the cactus below.

This is a deceptive (yet sadly common) practice— and apparently many people do get fooled by it —as we found garden forum posts and warning articles about it, including here, here, here and here.  This seems not so far away from buying a fruit tree at a nursery, only to find out (once you get it home) that the fruit was only glued to the tree.

Untitled

It looks like they are trying to make the less showy cactuses compete with the brightly colored grafted ones that they sell, like the ones shown pictured here. (This may not be a naturally occurring configuration, but at least it is a real, living plant.)

Untitled

Strawflowers are used because they keep their color well after drying. They also open and close as the humidity changes and they absorb more water or dry out more, giving the illusion of being part of a living plant.

And if it’s not bad enough that the customer is being deceived about the nature of plant they are buying, the glue can often damage the plant below, especially during the removal process.

Vintage Technology: Laser and Video Discs

Laser and video discs 2

OMG—Is that Once Upon a Time in China IV?

Well, yes, but that’s not what we’re here to talk about. We’ve dug up specimens of two very different types of high-tech video playback media from decades ago— and it’s much more interesting than you might guess. Continue reading Vintage Technology: Laser and Video Discs

Eggers using Eggbots

One of our favorite things about the Eggbot is that we get to connect to the communities that embrace it and find new uses for it. One such group is (not surprisingly) egg artists. They affectionately call themselves “eggers” and are, more likely than not, members of the International Egg Art Guild. One of their enterprising members, Fran, has been creating patterns for use with the Eggbot and sharing them through the Eggers Eggbot Group on Facebook or on Thingiverse.

A pattern, after being marked with the Eggbot using a pencil or marker, can be carved, painted, or decorated in a variety of ways. Carving is generally done by hand using a lightweight air powered drill (such as the Turbo Carver).

As with any specialized group of enthusiasts, they have regional shows to display and sell their creations, and to buy and sell the tools of the trade. Fran uses her Eggbot both for marking eggs for her own projects, and for marking eggs to sell at shows for others to finish.

The Eggbot is particularly useful in evenly distributing a repeating pattern around the egg—something that can be difficult to do by hand. The interlocking circles shown on two of the ostrich eggs above were also used to make the egg ornament at the top.

Thank you to Fran for sharing your pictures and projects!