Make repositionable googly eyes with sticky-backed rubber magnets, or promotional magnets and a drop of glue.
Continue reading Magnetic Googly Eyes: For the Benefit of All Mankind


Make repositionable googly eyes with sticky-backed rubber magnets, or promotional magnets and a drop of glue.
Continue reading Magnetic Googly Eyes: For the Benefit of All Mankind
Hobby servo motors are the little wonders that make radio-control boats, airplanes, cars, hovercrafts, helicopters, submarines and robots work. And they are excellent devices for hacking.
Hobby servo motors each contain a little motor, which (through a set of gears) turns the output shaft, which is connected to a potentiometer, which provides position feedback to the controller chip inside the servo, which commands the motor to move until the output shaft reaches the desired position.
We’ve seen all kinds of crazy and wonderful servo modding– from the standard continuous rotation mod to the simple electronic speed controller, to full-on (servo) brain transplants.
Some time ago, I wrote up an article an article in Make Magazine, about how to modify a hobby servo motor to precisely control a one-ton scissor jack. The resulting sub-$100, one-ton linear servo motor can be used for any number of CNC and robotics projects. (For our own use, this was the Z-axis lift motor of the CandyFab 4000.)
We are now pleased to report that this project has just been released to the public over at Make Projects, where they have released a step-by-step version of the magazine article. (So go take a look!) One note: be sure to download the two PDF documents listed under “Files” — you’ll need those diagrams to follow along with the project.
Happy birthday to us! Evil Mad Scientist Laboratories has now been around for four years. We’ve collected some interesting projects from this past year to celebrate.
Microcontroller and Electronics Projects:

Moving from breadboard to protoboard

Revenge of the Cherry Tomatoes

Accelerometer with an AVR (updated)

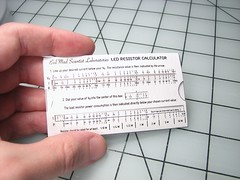
Wallet-size LED Resistance Calculator
Science:

Gibberellic Acid and Giantism in Sprouts
Simple LED Projects:
Food Hacking:

Marmalade: easier than it looks
Kit Projects:
Crafty Projects:
Geek Design:

Typgraphical Character Coasters
And, don’t forget, you can win a Peggy 2 or one of 13 other prizes in our clock
concept contest, going on this week.
Related:
It’s a busy week at the labs here. We’re getting ready for Maker Faire this weekend in San Mateo, CA– the biggest, baddest, and most awesomest DIY festival of the year.
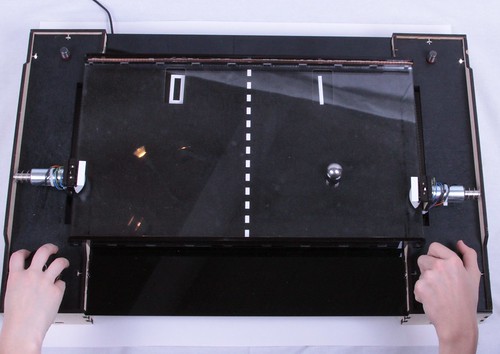
We’ll be showcasing an updated version of our mechanical Pong game. We’ve added a curved playing field, new user-friendly knobs, and a host of other improvements that we’ll plan to write about at a later date. We hope you’ll come by and try it out–we’ll be on the west side of the Expo hall.

Some of the other projects that we’ve taken to Maker Faire in the last few years include our Interactive LED Dining Table, CandyFab, Bristlebots, Interactive LED Coffee Table, Peggy 2, and Meggy Jr RGB.
We’re also participating in the Open Source Hardware Panel, on Saturday at 1 pm at the Innovation Stage at the south end of the Expo Hall.
We’ll have much more to say about this later, but we’re thrilled to announce our new collaboration with Bruce Shapiro, Ben Trombley, and Brian Schmalz. While we’re demonstrating the Tabletop-Pong game, Bruce and friends will be giving a sneak peek at the results of our collaboration: a fantastic new version of the Eggbot kit, which we are preparing for release as an open source kit sometime this summer.
You can sign up here for more info about the kit, and you can try out the Eggbots– or just see them in action –in the center of the Expo Hall.
Lastly, to help get everyone else in the DIY mood, we’re having a DIY Fever sale over at the store, with 20% off of Evil Mad Science open-source kit favorites such as the Larson Scanner, Meggy Jr RGB and the Bulbdial Clock, and 10% off of everything else!
Happy hacking, and we’ll hope to see you all at the Faire!
Cheap RC car + piece of string = radio control string cat toy
Sure, that iPad’s fun. But doesn’t your arm get tired propping up one and a half pounds after an hour or two?
Yes, one thing that the iPad is definitely missing is angle. A laptop has an adjustable screen, and you can just set it on your lap for couchborne surfing. Just set the iPad on your lap and… well… it’s sits there taunting you, pointing at the ceiling.
You can try sitting cross-legged like Steve Jobs, angle your knees with the help of the coffee table, or give up and shell out for a tabletop dock.
No, it’s not the end of the world. But shouldn’t fun new toys just be… fun?
So here is our solution: a DIY adjustable-angle iPad stand for your lap. Inexpensive, cozy, and light. Designed for both portrait and landscape use, and ready to fold up for transport and storage. With a stand, you can use your ‘Pad with zero, one, or two hands, and sit how you darn well please.
A sordid tale, starting in the bedroom, involving batteries, deceit, cheap tricks, LEDs, and a pot.
Continue reading Faking it: seven-segment displays
I never really set out with the goal of roasting my own coffee beans, it just kind of happened.
It started a month ago when we got a coffee grinder. Naturally we started getting whole bean coffee, which we used at a rate of about one pound per week. While I’m not (by any standards) a coffee connoisseur, I found myself noticing that the first pot of coffee out of the new can really was just betterthan the last pot of coffee out of the old can– meaning that the coffee quality does actually decline noticeably after just a week.
Now, that’s a minor annoyance, and hardly cause for action. But, two weekends ago I happened to be browsing in a home brewing store (needed champagne yeast– that’s another story) where there were sealed bags of green coffee beans just sitting there on the shelf. Fair trade, organic, and in a number of varieites. Only 5 bucks a pound. So what the heck, right?
It turns out that there’s a common and cheap method of roasting coffee at home: using a regular air popcorn maker. You put the beans in the popper as though they were popcorn kernels, heat them for a few minutes until they’re properly roasted, and then cool them. (You can read the details of this process here, here, here, and here, amongst other places.) This is kind of neat because it doesn’t take much in the way of equipment and it roasts just enough for a big pot of coffee.
The weak point in the popper method is the cooling. The beans keep roasting as long as they are still hot, so many of the sites suggest pouring the beans back and forth between a couple of metal colanders until they cool down. We tried it, and while it did cool them faster than a cookie sheet, it was more tedious than fun. It also seemed a bit silly to use this nice semi-automatic roaster and then turn it over to a manual process for the next few minutes. So, here is our better (if somewhat obvious) solution: a dedicated coffee cooling tower, built from a second modified air popper. Continue reading Roasting coffee at home: a DIY coffee bean cooler
A simple design project for font lovers: Single-character typographic coasters.
We’ve picked up a bunch of improvements on our Edge-Lit Holiday Cards since last year and we’ve collected them here for you to see. (Also, welcome Popular Science readers! This project is mentioned in the December 2009 issue.)